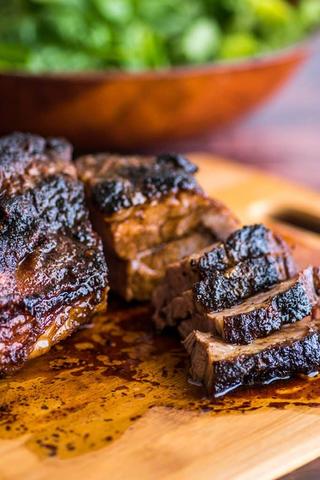
Introducing Thermoworks Billows: Revolutionizing Grilling and Smoking with Precision Temperature Control. Discover the ultimate BBQ companion that effortlessly maintains consistent heat levels, ensuring perfect results every time. Say goodbye to constant monitoring and hello to stress-free outdoor cooking. Elevate your grilling game with Thermoworks Billows – your secret ingredient for deliciously tender meats and unforgettable flavors.
What Grills and Smokers Does Billows Work with?
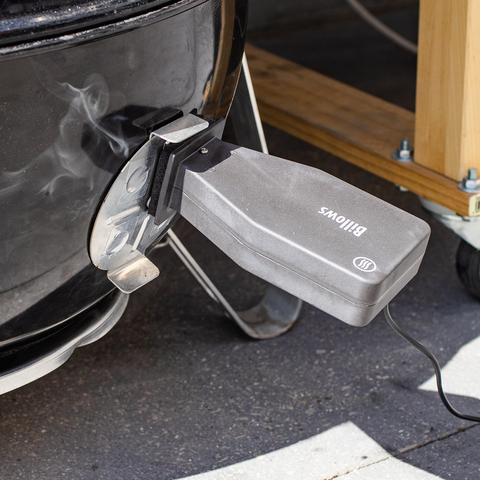
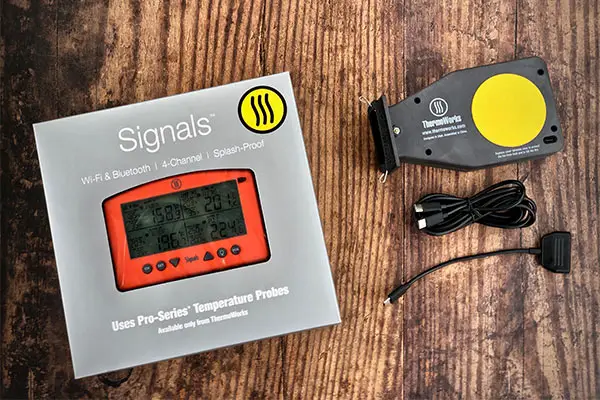
The Billows temperature control fan kit is designed to work with the ThermoWorks Signals or Smoke X system. The Signals unit acts as the temperature control module, while the Billows is the actual fan unit that installs directly to your charcoal or kamado grill. It is important to note that the Billows system is not compatible with gas or pellet grills, and it is not recommended for use on stick burning Offset smokers.

For installation, you will need a few tools, basic mechanical skills, and approximately 15 minutes. The process may vary depending on your specific grill type. If you own a Kamado style charcoal grill, installation is even simpler as ThermoWorks provides attachments that click into the existing vent areas and the Billows snaps into place.
To install the Billows fan module on a Weber Kettle Premium (or similar model), start by cleaning out your grill and removing any ash or soot that may be stuck to the sides. Mark the resting place of the Tri-Star ash cleaner/vent system when fully closed and fully open. Drill a hole below the charcoal grate hanger using an Arbor and 1″ hole saw attachment. Debur the hole if desired.
Next, squeeze together the spring legs of the Billows fan unit output port and push them through the cut hole until they snap in place. Wire the Billows unit to your Signals controller using the provided USB-C cord and adapter. Connect the Signals High Temp Air probe to channel four on the Signals controller using the included probe clip.
Once all connections are complete and power is supplied to both units, you can turn on the Signals unit and set your desired temperature using either its button or through the ThermoWorks app. The Signals unit will automatically go into controller mode on Channel 4 when turned on.
After installation, you can light your charcoal with the Billows off and then turn on both units once the grill starts heating up. Close the bottom vents and set the top lid vent to your desired position. The Signals and Billows will work together to maintain the set temperature.
During testing, the Billows unit showed impressive performance in quickly reaching and holding temperatures. The ThermoWorks app allows for easy monitoring and adjustment of temperatures from anywhere with WIFI connectivity. The system is especially useful for maintaining consistent temperatures on a Weber Kettle or Kamado grill, which can be challenging without such a temperature control system.
In conclusion, if you are serious about charcoal grilling and doing long low temp cooks, the Billows and Signals system from ThermoWorks is worth considering. It offers convenience, consistency, and the ability to multitask while still achieving great BBQ results.
Installation Procedure of Billows on a Weber Kettle
Installation Procedure of Billows on a Weber Kettle
The installation procedure of the Billows temperature control fan kit on a Weber Kettle is fairly simple and can be completed in about 15 minutes. First, it is important to note that the Billows system is designed for use with charcoal grills and smokers, not gas or pellet grills. Additionally, it works in conjunction with the ThermoWorks Signals or Smoke X system.
To begin the installation, clean out your Weber Kettle as best as you can, removing any ash or soot from the bottom and sides. If you have a newer model with the Tri-Star ash cleaner/vent system, mark the resting place of the fingers when fully closed and fully open. The hole for the Billows unit should be drilled between these two marks, below the grate that holds the charcoal.
Using a drill with an Arbor and 1″ hole saw attachment, drill a hole from the inside out. Optional: debur the hole with a scotch pad attachment if desired. The Billows fan unit output port has a spring mechanism that needs to be squeezed together and pushed through the cut hole until it snaps into place.
Next, wire the Billows unit to your Signals controller using the provided USB-C cord and adapter. Connect one end of the cord to the power port on the adapter and plug it into either the 12V AC adapter or optional 12V battery pack. Then connect the other end of the cord to both the Billows fan port and power port on your Signals controller.
Install the Signals High Temp Air probe to your grill grate using the included probe clip, placing it close to where you will be cooking your food. Connect this probe to channel four on your Signals controller. When all connections are complete and you turn on your Signals unit, it will automatically go into controller mode on Channel 4.
With installation complete, you can now start using the Billows system on your Weber Kettle. It is recommended to light your charcoal with the Billows off, placing about a half chimney of unlit charcoal on one side of the grill and lighting the other half in a charcoal chimney. Once the charcoal is fully lit, dump it on top of the unlit charcoal and turn on the Signals and Billows unit.
Set your desired temperature on the Signals controller and close the bottom vents, leaving the top lid vent partially open. The Billows will quickly bring the grill to temperature and hold it consistently throughout your cook. You can monitor and adjust temperatures using either the Signals unit or ThermoWorks app.
Overall, installation of the Billows system on a Weber Kettle is straightforward and can greatly improve temperature control for long low-temperature cooks.
Tools Required
To install the Billows temperature control fan kit on a Weber Kettle or Kamado grill, you will need the following tools:
- Drill
- Arbor
- 1″ hole saw
- Scotch pad attachment (optional)
These tools will be used to create a hole in the grill for the Billows fan module and to connect the wires between the Billows unit and Signals controller.
Links to Tools You Probably Need
The Billows temperature control fan kit is a great addition to your charcoal or kamado grill setup. To install the Billows, you will need a few tools and some basic mechanical skills. ThermoWorks provides attachments that make installation even easier for Kamado style charcoal grills.
Before installing the Billows, it’s important to clean out your grill and remove any ash or soot. For newer Weber Kettle grills, you’ll need to mark the resting place of the Tri-Star ash cleaner/fan system and drill a hole below the charcoal grate hanger for the Billows fan unit.
Once the hole is drilled, you can easily snap in the Billows fan unit with its spring mechanism. Next, connect the Billows unit to your Signals controller using the provided USB-C cord and adapter. Make sure to connect the temperature probe to channel four on the Signals controller.
With all connections made, you can now turn on the Signals and Billows unit and set your desired temperature using either the Signals unit or ThermoWorks app. The Billows fan will automatically adjust airflow to maintain consistent temperatures.
When starting a cook, it’s recommended to light your charcoal with the Billows off. Once lit, turn on the Signals and Billows unit and set your desired temperature. Close the bottom vents and monitor your cook using either the Signals unit or ThermoWorks app.
The installation process is straightforward and should only take about 15 minutes with basic tools. Once installed, you can enjoy precise temperature control and consistent cooking results with your charcoal or kamado grill.
Installation Procedure
The installation of the Billows temperature control fan kit on a Weber Kettle or Kamado grill is relatively simple and can be completed in about 15 minutes. Here is a step-by-step guide:
- Clean out your grill by removing all interior components and ash from the bottom.
- If you have a newer style kettle with the Tri-Star ash cleaner/vent system, mark the resting place of the fingers when fully closed and fully open. Between those two marks, mark where you will need to drill a hole for the Billows fan unit.
- Using a drill with an Arbor and 1″ hole saw attachment, drill a hole from the inside out at the marked location. Optional: Debur the hole with a scotch pad attachment if desired.
- Squeeze together the spring legs on the Billows fan unit output port and push them through the drilled hole until it snaps into place.
- Wire the Billows unit to your ThermoWorks Signals or Smoke X controller using the provided USB-C cord and adapter. Connect one end of the cord to the adapter’s power port, which can be plugged into either the included AC adapter or an optional 12V battery pack.
- Install the Signals High Temp Air probe to the grill grate with the included clip, placing it close to where you put your food. Connect this probe to channel four on the Signals controller.
- Turn on both the Signals and Billows units. The Signals unit should automatically go into controller mode on Channel 4.
- Using either the button on the Signals controller or ThermoWorks app, set your desired temperature for your grill.
Once you have completed these steps, your Billows system should be installed and ready for use. It will work in conjunction with the Signals or Smoke X controller to maintain your desired temperature on your charcoal or kamado grill.
Step 1. Clean Kettle.
Step 1. Clean Kettle.
To begin the installation process of the Billows temperature control fan kit on your Weber Kettle, you will first need to clean your kettle. If you have a brand new unit, you can skip this step. Remove all interior components and clean out any ash from the bottom of the kettle. Make sure to also remove any ash or soot that is stuck to the sides of the kettle.
Step 2. Mark and drill hole for Billows fan.
Next, you will need to mark the resting place of the fingers on your kettle’s Tri-Star ash cleaner/vent system when fully closed and fully open. Between these two marks is where you will need to drill a hole for your Billows fan. Ensure that the hole is below the grate that holds the charcoal. Use a drill with an Arbor and 1″ hole saw attachment to drill the hole from the inside out. Optionally, you can debur the hole using a scotch pad attachment.
Step 3. Install Billows fan unit.
The Billows fan unit has a spring mechanism on its output port. Squeeze the spring legs together and push them through the hole you drilled in step 2. The spring mechanism should snap into place easily.
Step 4. Wire Billows unit to Signals controller.
The Billows kit includes a USB-C cord with an adapter at one end. Plug one end of the cord into the adapter’s power port and connect it either to the included 12V AC adapter or optional 12V battery pack for power. The other end of the cord should be plugged into the Billows fan port on your Signals controller.
Step 5. Connect temperature probes.
Attach the Signals High Temp Air probe to your grill grate using the included probe clip, placing it close to where you will be placing your food. Connect this probe to channel four on your Signals controller using one of its four probe ports.
Step 6. Turn on and set desired temperature.
After completing all the connections, turn on your Signals unit. It should automatically go into controller mode on channel four, indicated by a little fan icon on the top left corner of the screen. You can now use the button on the Signals or the ThermoWorks app to set your desired temperature.
Step 7. Start using Billows unit.
Once you have completed the installation of the Billows unit on your grill, you are ready to start using it. Follow your preferred fire up procedure for lighting charcoal, ensuring that you light it with the Billows off. Once your grill starts to heat up, turn on the Signals and Billows unit, set it to your desired temperature, and close the bottom vents. Monitor and adjust temperatures using either the Signals unit or ThermoWorks app.
Overall, installing the Billows temperature control fan kit on a Weber Kettle is a relatively easy process that requires basic mechanical skills and a few tools. The system works in conjunction with the ThermoWorks Signals or Smoke X units, providing precise temperature control for charcoal grills and smokers. With this kit installed, there is no need to constantly adjust vents to maintain consistent temperatures while cooking.
Step 2. Mark your Hole for Removal
Step 2. Mark your Hole for Removal
To install the Billows temperature control fan kit on your Weber Kettle or Kamado grill, you first need to mark the location where you will drill a hole for the fan unit. Clean out your grill and remove any ash or soot that may be stuck to the sides. If you have a newer style kettle with the Tri-Star ash cleaner/vent system, you’ll need to mark the resting place of the fingers when fully closed and fully open. Between those two marks is where you will drill your hole.
Make sure the hole is below the grate that holds the charcoal. Use a drill with an Arbor and 1″ hole saw attachment to drill from the inside out. Optional: You can debur the hole with a scotch pad attachment, although this step is not necessary.
The Billows fan unit comes with a spring mechanism on its output port. Squeeze the spring legs together and push them through your drilled hole until they snap into place. The tension is easy to work with, so this step should be straightforward.
Now that you have installed the Billows fan unit on your grill, it’s time to wire it to your ThermoWorks Signals or Smoke X controller. The Billows kit includes a USB-C cord with an adapter at one end. The adapter has two female ports – one for the Billows Fan and one for Power.
You can plug in the power port into either the included 12V AC adapter or an optional 12V battery pack for portable use. Connect the temperature probes as well – specifically, install the Signals High Temp Air probe onto the grill grate near where you’ll be placing food, and connect it to channel four on the Signals controller.
Once all connections are made and you’ve turned on the Signals unit, it will automatically go into controller mode on Channel 4. Now you can use either the button on the Signals or the ThermoWorks app to set your desired temperature.
With the installation complete, you’re ready to start using the Billows system. Follow the recommended fire up procedure for your charcoal and light it with the Billows off. Once the grill starts to heat up, turn on the Signals and Billows unit, set it to your desired temperature, and close the bottom vents. Leave the top lid vent partially open. The Signals unit will control the Billows fan to maintain your desired temperature throughout your cook.
Overall, installing the Billows fan kit is a relatively easy process that requires a few tools and basic mechanical skills. It should only take about 15 minutes to complete.
Step #3. Drill Out The Hole
Step #3. Drill Out The Hole
To install the Billows fan unit on your grill, you will need to drill a hole in the appropriate location. Start by cleaning out your Weber Kettle as best you can, removing any ash or soot that is stuck to the sides. If you have a newer model with the Tri-Star ash cleaner/vent system, you will need to mark the resting place of the fingers when fully closed and fully open. Between those two marks is where you will drill your hole. Make sure the hole is below the grate that holds the charcoal.
Using a drill with an Arbor and 1″ hole saw attachment, drill from the inside out. You can optionally debur the hole with a scotch pad attachment if desired. The Billows fan unit output port comes with a spring mechanism that needs to be squeezed together and pushed through your cut hole. There may be some tension, but it should snap into place easily.
After drilling out the hole and attaching the Billows fan unit, move on to Step #4: Wiring the Billows Unit to Your Signals Controller.
Step #4. Install Billows Unit to Grill
To install the Billows unit to your grill, start by cleaning out your Weber Kettle or Kamado grill. Remove all interior components and clean out any ash or soot that is stuck to the sides of the grill. For newer models with the Tri-Star ash cleaner/vent system, mark the resting place of the fingers when fully closed and fully open. Between those two marks, mark where you will need to drill a hole for the Billows fan module.
Using a drill with an Arbor and 1″ hole saw attachment, drill a hole from the inside out at the marked spot. Optional: debur the hole with a scotch pad attachment if desired. Next, squeeze together the spring legs on the output port of the Billows fan unit and push it through the cut hole until it snaps into place.
Now it’s time to wire the Billows unit to your ThermoWorks Signals or Smoke X controller. The Billows kit includes a USB-C cord with an adapter that has two female ports – one for the Billows fan and one for power. Plug in the power port into either the 12V AC adapter or optional 12V battery pack. Then, install the Signals High Temp Air probe to your grill grate using the included probe clip and connect it to channel four on your Signals controller.
Once all connections are made and you have turned on your Signals unit, it will automatically go into controller mode on Channel 4. You can now set your desired temperature using either the button on your Signals unit or through the ThermoWorks app on your phone.
After completing installation, you can start using your Billows unit by following a recommended fire up procedure for charcoal grills. Light your charcoal with the Billows off, put in about a half chimney of unlit charcoal on one side of the grill (for two-zone grilling), and light the other half in your charcoal chimney. Once lit, dump the charcoal on top of the unlit charcoal and let the grill heat up. Turn on your Signals and Billows unit, set it to your desired temperature, and close the bottom vents. You can leave the top lid vent partially open.
With the Billows system installed, you will have precise temperature control and consistent temperatures throughout your cook. The Signals unit allows you to monitor or adjust temperatures remotely using the ThermoWorks app. Overall, the installation process for the Billows unit is relatively easy and should only take about 15 minutes.
Step #5. Connect to Signals Controller
Step #5. Connect to Signals Controller
To connect the Billows unit to your Signals controller, you will need to follow these steps:
1. The Billows kit includes a USB-C cord with an adapter at one end. The adapter has two female ports, one for the Billows fan and the other for power.
2. Plug the power port of the USB-C cord into the 12V AC adapter that is included with the kit or use the optional 12V battery pack if you are traveling or camping.
3. Once you have power going to both the Signals and Billows units, it’s time to connect the temperature probes. This allows the Signals unit to know when to turn on or off the Billows fan in order to achieve your desired temperature.
4. Attach the Signals High Temp Air probe to your grill grate using the included probe clip. Place it close to where you will be cooking your food.
5. Connect the probe to channel four on the Signals controller. It is important that it is connected to this specific channel for it to work properly.
6. Once all connections have been made and you have turned on the Signals unit, it will automatically go into controller mode on Channel 4.
7. You can now use either the button on the Signals unit or the ThermoWorks app on your phone to set your desired temperature.
Once these steps are completed, your installation of the Billows system on your grill and connection to the Signals controller is complete. Your Signals screen should display a little fan symbol in the top left corner of Channel 4, indicating that everything is ready for you to set and maintain your desired temperatures during your cook.
Using the ThermoWorks Billows
The ThermoWorks Billows is a temperature control fan kit that works in conjunction with the ThermoWorks Signals or Smoke X system. To use the Billows, you need to install the fan module to your charcoal or kamado grill and connect it to the Signals controller. Attach a temperature probe to your grill grate and Signals controller. Once installed, you can set your desired temperature on your grill and let the Signals and Billows take care of maintaining it.
The installation process for the Billows is quite simple. It requires a few tools, basic mechanical skills, and approximately 15 minutes of your time. If you have a Kamado style charcoal grill, the installation is even easier as ThermoWorks provides attachments that click into existing vent areas, allowing for easy placement of the Billows.
Once installed, you can wire the Billows unit to your Signals controller using the provided USB-C cord and adapter. Connect the temperature probes to the Signals unit so it knows when to turn the Billows fan on or off to achieve your desired temperature. The Signals controller can be operated using either its built-in buttons or through the ThermoWorks app on your phone.
After completing installation, you can start using the Billows system. Light your charcoal with the Billows off initially, then turn on the Signals and Billows unit once the grill starts heating up. Set your desired temperature on either the Signals unit or through the app and close the bottom vents of your grill. The Billows will maintain consistent temperatures throughout your cook.
The ThermoWorks app allows you to monitor and adjust temperatures remotely through its WIFI connectivity feature. This makes it convenient for monitoring long cooks without having to constantly be by your grill or smoker.
Getting the Grill to Temp with the Billows
To get the grill to temperature using the Billows fan, start by lighting your charcoal with the Billows off. Open the bottom vents wide open and place about a half chimney of unlit charcoal on one side of the grill (for two-zone grilling). Light the other half of the chimney in a separate charcoal chimney. Once the charcoal is fully lit, dump it onto the unlit charcoal in the grill.
Once the grill starts to heat up, turn on both the Signals controller and the Billows unit. Set your desired temperature on the Signals controller and close the bottom vents. Leave the top lid vent partially open (around 25%). For example, if you want to cook at 350F, set that temperature on your Signals controller.
The Billows fan will work in conjunction with the Signals controller to maintain your desired temperature. It will automatically adjust airflow as needed to keep a consistent temperature inside your grill. The Billows unit works efficiently and can quickly bring your grill to temperature and hold it steady throughout your cook.
During cooking, if you need to open the lid for any reason, be aware that it may cause a slight fluctuation in temperature. However, once you close the lid again, the Billows fan will bring it back up to your desired temperature within 10-15 minutes.
Using this installation procedure and following these steps, you can easily get your grill to temperature using the Billows system and enjoy consistent cooking results without constantly adjusting vents.
Billows Temperature Management
The ThermoWorks Billows temperature control fan kit is designed to work in conjunction with the ThermoWorks Signals or Smoke X system. The Signals unit acts as the temperature control module, while the Billows is the actual fan unit that attaches to your charcoal or kamado grill. The installation process is relatively simple and can be completed in about 15 minutes with basic mechanical skills and a few tools.
To install the Billows fan module, start by cleaning out your grill and removing any ash or soot. Mark the resting place of the fingers on the Tri-Star ash cleaner/vent system, and drill a hole below the charcoal grate hanger using a 1″ hole saw. The Billows fan unit output port comes with a spring mechanism that easily snaps into place in the drilled hole.
Next, wire the Billows unit to your Signals controller using the included USB-C cord and adapter. Connect the temperature probes and clip the Signals High Temp Air probe to the grill grate near where you will be placing your food. Connect this probe to channel four on the Signals controller.
Once all connections are made and power is supplied to both units, turn on the Signals unit and set your desired temperature using either the button on the Signals or through the ThermoWorks app. The Billows will automatically adjust airflow to maintain consistent temperatures throughout your cook.
The Billows system is ideal for use with charcoal grills and smokers, but not recommended for gas or pellet grills. It works best with grills like Weber Kettle Premium or Kamado style charcoal grills where attachments can easily snap into existing vent areas.
In conclusion, installing and using the ThermoWorks Billows temperature control fan kit is a straightforward process that greatly simplifies temperature management during cooking. By allowing you to set and maintain your desired temperature, the Billows system takes the guesswork out of achieving consistent results on your charcoal grill or smoker.
Billows Accessories
The Billows temperature control fan kit from ThermoWorks comes with a few recommended accessories that can enhance its performance or aid in its installation.
One accessory worth considering is the fan damper. Without the damper, the Billows system can have a lot of airflow, especially on small kettle or Kamado grills. Adding the damper and keeping it half open can help regulate the air flow for grills and smokers of this size.
ThermoWorks also offers various mounting kits that make installation easy. These mounting kits are designed for different types of grills, so you can choose the right one for your specific grill model.
If you’re planning to cook off the grid, ThermoWorks offers a battery pack as an accessory. This battery pack can power both the Billows and Signals units for up to 24 hours, which is more than enough time for any large cut of meat.
Overall, these accessories can improve the performance and usability of the Billows system, making it a great addition to your charcoal grill or smoker setup.
Fan Damper
The first recommended accessory for the Billows system is the fan damper. This accessory helps to control the airflow and prevent excessive air flow, especially when using a small kettle or Kamado grill. By adding the fan damper and keeping it half open, you can achieve optimal air flow for grills of this size.
ThermoWorks offers various mounting kits that make installation of the Billows system easy. These kits are designed to fit different types of grills, ensuring a secure and proper installation. Choose the mounting kit that is compatible with your specific grill model for hassle-free installation.
For those who enjoy cooking off the grid or in locations without access to electricity, ThermoWorks offers a battery pack as an optional accessory. The battery pack can power both the Billows and Signals units for up to 24 hours, providing ample power for long cooking sessions.
Overall, the Billows temperature control fan kit is a highly recommended addition for charcoal grills and smokers. It offers precise temperature control, eliminates the need for constant vent adjustments, and ensures consistent cooking results. With additional accessories like the fan damper, mounting kits, and battery pack, you can enhance the performance and convenience of your Billows system.
Mounting Kits
ThermoWorks offers a variety of mounting kits that make the installation of the Billows system easy. They have different mounts available to fit different types of grills, so you can choose the one that is right for your grill.
If you plan on cooking off the grid or in a location without power, ThermoWorks also offers a Battery Pack that can power both the Billows and Signals units for up to 24 hours. This is a great option if you are doing a long cook and need extended power.
Overall, I highly recommend the Billows temperature control fan kit. It is a quality product from ThermoWorks and does exactly what it claims to do. While it may be a bit of an investment if you don’t already own a Signals unit, it is well worth it for serious charcoal cooks. The Billows allows for consistent temperatures and takes the guesswork out of adjusting vents manually. Plus, with the Signals unit’s WIFI connectivity, you can monitor and adjust temperatures from anywhere using your phone. Embracing technology like this can greatly improve your BBQ results while still allowing you to multitask during the day.
Battery Pack
The Battery Pack is a great accessory to have for the Billows system. It allows you to power the Billows and Signals units for up to 24 hours, making it perfect for cooking off the grid or during camping trips. With this battery pack, you don’t have to worry about finding a power source or running out of power in the middle of a cook. It provides long-lasting power that is more than enough for any large cut of meat. The Battery Pack is a worthwhile investment if you want to enhance the performance and convenience of your Billows system.
In addition, ThermoWorks offers various mounting kits that make installation of the Billows system easy. They have different mounts available for different grill types, ensuring that you can find the right one for your specific grill. These mounting kits provide a secure and stable attachment for your Billows unit, allowing it to function effectively and without any issues.
Another accessory that I recommend getting is the fan damper. This accessory helps regulate air flow when using the Billows on smaller grills or smokers like a kettle or kamado grill. Without the damper, there can be excessive air flow which may affect temperature control. By adding the damper and adjusting it to half open, you can achieve better control over air flow and maintain consistent temperatures.
Overall, I am highly satisfied with the performance and functionality of the Billows temperature control fan kit. ThermoWorks has once again delivered a high-quality product that does exactly what it claims to do. While the price may be considered steep if you don’t already own a Signals system, I believe it is worth every penny if you are serious about charcoal cooking and doing long low-temperature cooks on a kettle or kamado grill. The convenience and precision offered by the Billows system allows you to achieve excellent BBQ results while still being able to attend to other tasks during the day. Embracing technology that improves BBQ processes is not cheating, but rather a way to enhance our overall cooking experience.
What We Like About the Signals and Billows System

We are big fans of the ThermoWorks Signals and Billows system for several reasons. First, the installation process is simple and straightforward, requiring only a few tools and basic mechanical skills. It can be easily installed on a Weber Kettle Premium or a Kamado style charcoal grill.
The Signals unit acts as the temperature control module, allowing you to set your desired temperature on the grill. The Billows fan unit then works in conjunction with the Signals unit to maintain a consistent temperature. This eliminates the need for constantly adjusting vents to achieve the perfect temperature.
We were impressed with how quickly the Billows system got our grill to temperature and how well it held the temperatures throughout our cook. The charts from the ThermoWorks Signals app demonstrated how consistent the temperatures stayed during our cooking process.
Additionally, we appreciate that the Billows system is designed specifically for charcoal grills and smokers. It may not work well with gas or pellet grills, but it is ideal for those who prefer charcoal cooking methods.
The ability to control and monitor temperatures remotely using the ThermoWorks app is another major advantage of the Signals and Billows system. This allows us to multitask and attend to other tasks while still maintaining control over our grill.
In summary, if you are serious about charcoal cooking and enjoy long, low-temperature cooks, we highly recommend considering the Signals and Billows system. It not only simplifies temperature control but also enhances your overall BBQ experience.
What We Don’t Like About the Signals and Billows System

1. The cost: The Signals and Billows system is quite expensive, especially if you don’t already own a Signals unit. It can be a significant investment for some, costing over $300.
2. Limited compatibility: The Billows system is designed specifically for charcoal grills and smokers, so it may not work with other types of grills such as gas or pellet grills. It is also not recommended for use on stick burning offset smokers.
3. Additional tools required: While the installation process is relatively easy, you will need a few tools and basic mechanical skills to install the Billows fan module to your grill.
4. Dependency on technology: Some people may see relying on technology for temperature control as cheating or taking away from the traditional BBQ experience.
5. Inaccuracy of built-in temperature gauge: The review mentioned that the built-in temperature gauge on their Weber Kettle was extremely inaccurate, highlighting the need for an upgrade in the future.
Overall, while there are a few drawbacks to consider, the reviewer still highly recommends the Signals and Billows system for those serious about charcoal cooking and looking for convenience and consistent temperatures during long low temp cooks.
ThermoWorks Billows Final Thoughts

ThermoWorks Billows Final Thoughts
The ThermoWorks Billows temperature control fan kit is a great addition for charcoal grills and smokers. It works in conjunction with the ThermoWorks Signals or Smoke X system, allowing you to set and maintain your desired temperature on your grill without constantly adjusting vents.
The installation process is relatively simple, requiring only a few tools and basic mechanical skills. For Weber Kettle Premium owners, it involves marking and drilling a hole below the charcoal grate hanger to install the Billows fan unit. Kamado style charcoal grills have an even easier installation process with attachments provided by ThermoWorks.
Once installed, you can wire the Billows unit to your Signals controller using the included USB-C cord and adapter. Connect the temperature probe to channel four on the Signals controller so it knows when to turn the fan on or off to achieve your desired temperature.
During testing, the Billows performed exceptionally well in maintaining consistent temperatures. It quickly got the grill up to temperature and held it steady throughout the cook. The charts from the ThermoWorks Signals app demonstrated this consistency, with slight fluctuations occurring only when the lid was opened.
The ability to control and monitor temperatures remotely through WIFI connectivity is a standout feature of the Signals unit. It allows you to adjust settings and keep an eye on your roast temperature wherever you are.
Overall, I am extremely pleased with the performance of both the Billows and Signals units. They make charcoal grilling much more convenient and reliable, especially in maintaining consistent temperatures during long low temp cooks. While there is a significant investment required if you don’t already own a Signals system, I believe it is worth it for serious charcoal enthusiasts.
In conclusion, if you’re looking for an efficient way to control temperatures on your charcoal grill or smoker, I highly recommend considering the ThermoWorks Billows and Signals system. Its ease of use, reliability, and remote monitoring capabilities make it a valuable tool for achieving great BBQ results.
In conclusion, Thermoworks Billows is an innovative temperature control device that offers convenience and accuracy for grilling and smoking enthusiasts. With its easy-to-use features and reliable performance, it ensures optimal cooking results every time. Whether you’re a beginner or a seasoned pitmaster, the Thermoworks Billows is a valuable tool that enhances your outdoor cooking experience.
Learn More About Grilling
If you want to learn more about grilling, check out these other helpful resources!