Let me tell you about the time my neighbor Jake tried to sneak a propane grill onto his apartment balcony. The landlord shut that down faster than you can say “fire hazard.” Jake was crushed. He’d been dreaming of grilled steaks all summer. That’s when I showed him my Char-Broil Electric Patio Bistro, and everything changed.
If you’re reading this, you’re probably in Jake’s shoes. You want real grilled food but can’t have open flames. Or maybe you’re tired of lugging propane tanks around. Whatever brought you here, I’ve got good news. The Char-Broil Electric Patio Bistro might be exactly what you need.
What Makes the Char-Broil Patio Bistro Different?
Here’s the thing about electric grills. Most of them are basically George Foreman wannabes pretending to be outdoor equipment. The Char-Broil Electric Patio Bistro is different. It actually grills.
The secret? TRU-Infrared technology. Instead of heating air that then cooks your food, this system transfers heat directly to the grates. Your burger gets seared. Your chicken stays juicy. Fat drippings vaporize and send flavor right back into your food.
I’ve owned mine for two years. Before that, I tested a cheap electric grill that took 45 minutes to cook a chicken breast. It was basically an outdoor Easy-Bake Oven. The Char-Broil? It gets hot. Really hot. We’re talking 450-550°F.

View Deal Here
Check Price on Amazon
The Two Main Models: 180 vs 240
You’ll see two versions floating around. The Char-Broil Electric Patio Bistro 240 vs 180 debate is simpler than people make it.
The 180 model gives you 180 square inches of primary cooking space plus a 65-square-inch warming rack. Total: 245 square inches. It runs on 1500 watts.
The 240 bumps you up to 240 square inches primary, 80 square inches on the warming rack. Total: 320 square inches. This one packs 1750 watts of power.
Which one do you need? If you’re cooking for yourself or one other person most of the time, the 180 works fine. Cooking for a small family or like having friends over? Get the 240. The extra cooking space matters more than you’d think.
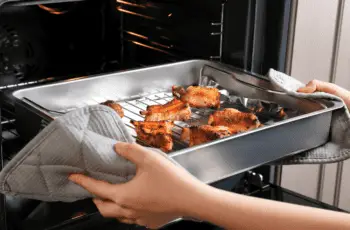
I have the 240. On a typical Saturday, I can fit four quarter-pound burgers, six hot dogs, and still have room for a few peppers on the warming rack. With the 180, I’d be cooking in shifts.
Read more: Royal Gourmet CC2036F Review
Understanding the Char-Broil Electric Patio Bistro Grill

Let’s talk about Char-Broil Electric Patio Bistro dimensions. This isn’t just numbers on a spec sheet. These measurements determine whether this grill fits on your balcony.
Height: 38.2 inches Width: 25.2 inches
Depth: 24.4 inches Weight: 40 pounds
Picture this. The grill is roughly the size of a large outdoor side table. Not huge, but not tiny either. It fits comfortably on a standard apartment balcony with room to move around. I have about two feet of clearance on each side, which feels right.
The weight surprised me at first. Forty pounds is heavy for something this compact. But that weight means stability. No worrying about it tipping over in wind.
One critical dimension most reviews skip: the power cord. It’s short. Really short. After you route it around the legs to the back, you’ve got maybe two feet left. You’ll need an extension cord. More on that headache later.
Setting Up Your Grill: Assembly Reality Check

The box arrives. You’re excited. Then you open it and see… parts. Lots of parts.
Assembly takes 60-90 minutes. The instruction manual relies heavily on pictures with minimal text. Sometimes you’ll stare at a diagram wondering if piece A-7 is the same as A-7R. It usually is, but confirmation would be nice.
You’ll need basic tools: Phillips screwdriver, pliers, and a socket wrench. Nothing fancy. Having a second person helps. You don’t need one, but it’s helpful when you’re trying to hold a shelf in place while securing bolts.
Here’s a tip nobody tells you. The grill arrives with a sticker on the front. Remove it before assembly, not after. I made this mistake. The adhesive is industrial-strength. I spent twenty minutes scrubbing sticky residue off with rubbing alcohol. Learn from my pain.
The grates need to align precisely with the heating element. Three notches on the front of the grate sit over the element connection. If you don’t line this up, the grate wobbles. You’ll know immediately when it’s wrong.
Most parts fit together smoothly. The holes align. The hardware makes sense once you get going. After the first twenty minutes of confusion, things click into place.
Real-World Cooking Performance
Theory is great. But how does this thing actually cook?
Preheating: The Waiting Game
Turn the knob to high. Now wait. You’ll need 15-20 minutes for the grill to reach cooking temperature. On warm days, maybe 15 minutes. When it’s 60°F outside? Plan for 25 minutes.
This is slower than gas. My buddy’s propane grill hits temperature in seven minutes. But it’s way faster than charcoal. And you’re not dealing with lighter fluid or waiting for coals to ash over.
I’ve developed a routine. I start the grill, go inside and prep my food, and by the time I’m done, we’re ready to cook.
The Temperature Drop Problem
Open the lid to flip your burger. Watch the temperature gauge plummet. We’re talking a 100-150 degree drop in seconds. Sometimes it crashes from 450°F down to 250°F.
This shocked me at first. My food was taking forever. Then I learned the trick: minimize lid opening. Seriously. Treat it like an oven. Set your timer and don’t peek.
After you do open the lid, expect 5-10 minutes for temperature recovery. In cold weather or wind? Could be 15 minutes. This completely changes how you grill.
Forget about the constant checking and flipping you do on a gas grill. Cook low and slow. Use timers. Trust the process.

What Cooks Well (And What Doesn’t)
Home runs:
- Burgers (perfectly even, great crust)
- Chicken breasts (stay moist, thank you infrared)
- Sausages (no flare-ups means no split casings)
- Vegetables (the narrow grate spacing is clutch)
- Hot dogs (set it and forget it)
Decent but not amazing:
- Thin steaks work great
- Thick steaks (over 1.5 inches) struggle without high heat
- Pork chops do fine
- Fish works if you’re careful
Forget about it:
- Anything requiring rapid temperature changes
- Foods needing 600°F+ searing
- Cooking for a party of 8+
I grilled ribeyes last weekend. One-inch thick, beautifully marbled. They came out medium-rare with decent grill marks. Were they as good as the steakhouse? No. Were they better than anything I could do in a pan? Absolutely.
Smoking on an Electric Grill? It Actually Works

View Deal Here
Check Price on Amazon
This blew my mind when I discovered it. You can smoke food on the Char-Broil Electric Patio Bistro. Not “smoke” like burned food. Real smoking with wood chips.
The infrared system creates open spaces on the grates. Toss a handful of wood chips directly on the grate. No soaking needed. The chips smolder and smoke.
I’ve smoked salt, chicken, tri-tip, and ribs. The results surprised me. Because the smoke is so close to the food, flavor penetrates quickly. It’s more efficient than my friend’s dedicated smoker for small batches.
The trick? Finding the right temperature. Too hot and the chips burn up in minutes without smoking. Too cool and they just sit there. I’ve had the best luck around 300-350°F.
Start with a small handful of chips. Once they’re done, add more right on top. Hickory works great for pork. Mesquite for beef. Apple wood for chicken.
You won’t get the same results as an overnight brisket in a proper smoker. But for weeknight smoking? It absolutely delivers.
Comparison Shopping: How Does It Stack Up?
Char-Broil Electric Patio Bistro vs Weber Q1400
| Feature | Char-Broil Patio Bistro | Weber Q1400 |
|---|---|---|
| Cooking Area | 320 sq. in. | 280 sq. in. |
| Max Temperature | Lower | 600°F+ |
| Heating Speed | Slower preheating | Faster preheating |
| Build Quality | Standard construction | Stronger, more robust |
| Weather Performance | Best for warm climates | Better for cold weather |
| Cooking Features | Integrated temp gauge, Two-tier cooking system | Basic feature set |
| Grilling Results | Better grill marks, Less smoke | High-heat performance |
| Best For | Budget-conscious buyers in warm climates | Performance seekers needing reliability in the cold |
Char-Broil Electric Patio Bistro vs Bradley Electric Smoker
| Feature | Char-Broil Patio Bistro (Electric) | Bradley Smoker (Original 4-Rack) |
|---|---|---|
| Primary Function | Grilling / Searing (High Heat) | Smoking (Low & Slow) |
| Heating Power | 1750 Watts (High power for searing) | 500 Watts (Cooking) + 125 Watts (Smoking) |
| Max Temperature | ~550°F (288°C) | ~250°F - 280°F (120°C - 138°C) |
| Cooking Area | ~240 sq. in. (Circular grate) | ~572 sq. in. (Across 4 vertical racks) |
| Smoke Source | Wood chips added manually to grate | Proprietary Bradley Bisquettes (Auto-fed) |
| Dimensions | 25.6" W x 24.4" D x 39.8" H | 17" W x 14" D x 31" H (Cabinet only) |
| Est. Price | $150 – $250 | $350 – $500 |
| Best For | Burgers, Steaks, Chops, Grilled Veggies | Ribs, Brisket, Salmon, Jerky, Cheese |
Char-Broil Patio Bistro Grill Parts and Maintenance
Every grill needs maintenance. The good news? Char-Broil Electric Patio Bistro parts are readily available.
The Heating Element
The Char-Broil Electric Patio Bistro heating element is the heart of the system. It’s a coiled element that wraps around to heat the entire cooking surface. One end connects firmly, the other floats free.
This element should last years. Mine is still going strong after two years. Some users report failures after 1-2 years. It’s the most common point of failure.
Replacing it requires basic tools. Char-Broil sells replacements for around $30-50. The part availability is a huge plus. You’re not replacing the whole grill if something breaks.
One warning: when cleaning the bowl under the element, be gentle. That free-floating end can be pushed down accidentally, stressing the secured connection. Don’t ask me how I know this.

The Infamous Grates
The grates are porcelain-coated steel. They’re durable but not indestructible. The coating can chip or scratch if you’re aggressive with metal tools.
Clean them gently. I use the high-heat burn-off method followed by a nylon brush. The Char-Broil nylon brush is worth buying. It’s specifically sized for the V-grooves.
Here’s the annoying part. The grate is round and huge. It doesn’t fit in a standard kitchen sink. You’ll clean half at a time, rotating it. Or use a bathtub. Or clean it outside with a hose.
The V-shaped grooves trap debris. Getting them perfectly clean is nearly impossible after the first use. Accept this early and save yourself frustration.
Temperature Gauge
The lid-mounted gauge is handy but not perfect. It reads the temperature at the top of the grill, which runs cooler than the cooking surface. Actual grate temperature is higher than displayed.
Some users report gauge failures. Replacements are available. You can also use an infrared thermometer to check actual surface temps.
Char-Broil Electric Patio Bistro Grill Cover

A Char-Broil Electric Patio Bistro cover isn’t optional. It’s mandatory.
This is an electric grill. It has electrical components. It needs protection from weather. The porcelain coating resists rust, but it’s not magic. Moisture will damage things over time.
Char-Broil makes a dedicated cover. It fits perfectly, leaving just the legs exposed. Heavy-duty 600D fabric. Water-resistant. Costs $20-35.
Some people use a generic round grill cover. The Kamado-style covers fit reasonably well. Just check dimensions first.
I bought the Char-Broil cover. After two years of sun, rain, and occasional snow, it’s still in good shape. The grill underneath looks nearly new.
Store the grill indoors if possible during winter. I don’t have that option, so the cover is my insurance policy.
Pros and Cons
| pros | cons |
|---|---|
|
|

View Deal Here
Check Price on Amazon
FAQs
- Can I use the Char-Broil Electric Patio Bistro indoors or in a screened porch?
No, this grill is strictly for outdoor use only. Despite being electric, it generates carbon monoxide and smoke that can be dangerous in enclosed spaces like garages or screened porches.
- Can I use an extension cord?
Yes, but safety is key. You must use a heavy-duty, outdoor-rated extension cord (marked “W-A”) that is rated for at least 15 amps to prevent fire hazards or damage to the grill.
- Why isn’t my grill getting hot enough?
The most common reason is that the temperature control probe is not fully plugged in. Push the controller firmly into the side of the grill until it clicks; otherwise, the heating element won’t engage properly.
- Is the lid temperature gauge accurate?
It gives you a general idea, but it measures the air temperature under the hood, not the grate temperature. Because of the infrared technology, the cooking grates are usually significantly hotter than what the lid gauge shows.
- Can I use aluminum foil to line the bottom bowl?
No, you should never line the firebox with foil. This traps heat and restricts airflow, which can cause the internal components to overheat and potentially melt the plastic handles.
- What is the best way to clean the grates?
Use the “burn-off” method: after cooking, turn the grill to “High” for about 15 minutes to turn food residue into ash. Once it finishes, turn the grill off and scrub the grates with a nylon or stainless steel brush.
- Why are my stainless steel grates turning brown?
This is normal discoloration caused by high heat and actually improves performance. As the steel oxidizes and builds up a layer of seasoning, it helps prevent food from sticking.
- Why does the grill trip my circuit breaker?
This usually happens if moisture has entered the plug or if the circuit is overloaded. Since the grill draws about 15 amps, try plugging it into an outlet that isn’t sharing power with other high-energy appliances.
- Can I wash the heating element in water?
No, never submerge the heating element or the controller in water. The high heat of the grill generally keeps the element clean, so a simple wipe with a damp cloth when cool is all that is needed.
- Where does the grease go?
Grease drips through the grates and funnels into a removable grease tray located underneath the grill body. Check this tray every few cooks to prevent it from overflowing onto your patio.
Learn More About Grilling
If you want to learn more about grilling, check out these other helpful resources!