“Master the Art of Brisket on a Weber Kettle: Elevate your BBQ skills with our ultimate guide to perfectly smoked brisket using a Weber kettle grill. From choosing the right cut to achieving mouthwatering tenderness, discover expert tips and techniques to create show-stopping results every time.”
Brisket on the Weber Kettle: Recipe and How-to
For those who believe you need an offset smoker to make a good brisket, I can personally attest that smoking brisket on a Weber Kettle is more than sufficient. With over 15 years of experience, I have developed a straightforward recipe and consistent methods that are beginner-friendly.
When smoking brisket on a Weber Kettle, it’s important to consider the size of the meat. While larger packer briskets may be impressive, they may not fit well on a 22″ kettle. A good size for a brisket on a Weber Kettle is around 7-10 lbs trimmed. If you can only find larger packer briskets, don’t worry! Trimming can help you adjust the size to fit on the kettle.
The most important factor in selecting a brisket is the amount of intramuscular fat, also known as “striations” or “marbling.” USDA Choice or Prime Briskets are recommended as they have enough intramuscular fat. Avoid using Select grade as it tends to dry out. Trimming can also help address any potential issues with the meat.
Before smoking, it’s recommended to trim and season the brisket the day before for ease in preparation. Dry brining overnight is not necessary; 1-2 hours in the fridge is sufficient. Keeping things simple, cracked peppercorns, kosher salt, and Lawry’s seasoned salt or garlic powder are recommended for seasoning. Adjustments can be made based on personal preference.
There are various ways to smoke on a charcoal grill like the Weber Kettle. The Slow N’ Sear attachment provides convenience, but traditional methods like the snake method work well too. Vent adjustment is crucial for maintaining temperature range between 225-275F. A small amount of lit charcoal is needed to start, and dampers should initially be fully open to maximize airflow. Adjustments can be made as the smoker reaches desired temperature.
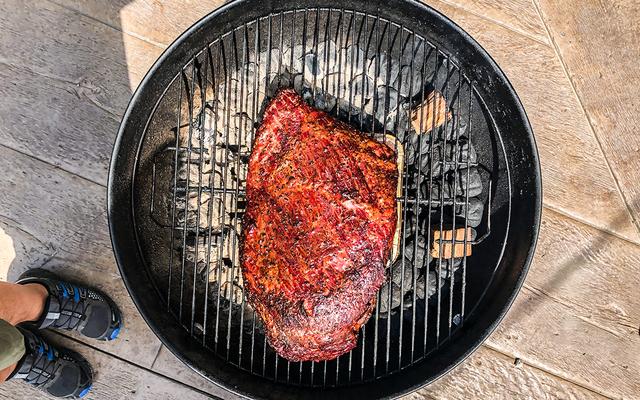
Placing the brisket in the indirect zone with the fat side facing the fire and fat cap up is recommended. This orientation helps shield and render the fat properly. Minimizing lid openings is important, as opening too frequently can affect cooking time. Adding wood chunks periodically enhances smoke flavor, with options like cherry wood providing a red hue to the meat.
Overall, smoking brisket on a Weber Kettle can yield delicious results without the need for an offset smoker. Following these steps and tips will help you achieve tender and moist brisket in your own backyard.
What to Look for in Brisket

When selecting a brisket, the most important factor to consider is the amount of intramuscular fat or marbling. Look for briskets that have visible striations of fat throughout the meat. USDA Choice or Prime grades are good options as they usually have enough intramuscular fat. Avoid using Select grade briskets as they tend to dry out during smoking.
Trimming the brisket is also important to ensure it fits on the Weber Kettle and cooks evenly. Trim off excess fat and protein, leaving a manageable size for the grill. If necessary, you can trim larger packer briskets to fit.
Remember that backyard barbecue is not a competition, so don’t stress too much about perfect trimming or grading. The taste and tenderness of the meat are what really matter. Keep it simple with a basic rub consisting of cracked peppercorns, kosher salt, and either Lawry’s seasoned salt or garlic powder. Adjust the amounts based on personal preferences.
USDA Select or Choice or Prime?
When it comes to choosing a brisket for smoking on a Weber Kettle, the most important factor is the amount of intramuscular fat in the meat. Look for briskets with good marbling or striations of fat throughout. The USDA grading system can be helpful in determining the quality of the meat, with Choice or Prime grades being ideal. Select grade briskets tend to dry out and should be avoided.
Trimming the brisket is an important step before smoking. Remove any excess fat and shape the brisket so that it fits well on the grill grates of your Weber Kettle. Trimming can also help to even out any gashes or imperfections in the meat.
When it comes to seasoning, keep it simple with cracked peppercorns, kosher salt, and either Lawry’s seasoned salt or garlic powder. Adjust the amounts based on your personal preference for saltiness. You can get creative with different rubs, but make sure they complement the size and flavor of the brisket.
Setting up your Weber Kettle for smoking involves creating indirect heat by placing charcoal on one side of the grill and placing the brisket on the other side. Vent adjustment is important to maintain a temperature range of 225-275°F. Start with a small amount of lit charcoal and adjust the intake damper to control airflow and temperature.
Monitor the temperature using a lid thermometer placed above the food, rather than above the fire. Avoid opening the lid frequently to maintain consistent heat and smoke levels.
Consider using wood chunks for added smoke flavor, such as cherry wood for its light yet appetizing aroma and reddish hue it imparts on beef and pork.
Overall, remember that backyard barbecue is about enjoyment rather than strict adherence to rules or perfection. Don’t stress too much about minor details – focus on achieving tender and moist results that will please your guests.
Other Factors to Consider
1. Temperature Control: Maintaining a consistent temperature is crucial for smoking brisket on a Weber kettle. Use the intake and exhaust dampers to control airflow and adjust the temperature accordingly. Aim for a range of 225-275°F.
2. Wood Choice: The type of wood you use can greatly impact the flavor of your brisket. Fruitwoods like cherry or nut woods like pecan or post oak are popular choices that complement beef well.
3. Minimizing Lid Opening: It’s important to minimize how often you open the lid during the smoking process to maintain consistent heat and smoke levels. Only open it when necessary, such as to add more wood chunks.
4. Fat Side Placement: When placing the brisket on the grill, position the fat side towards the heat source (fat cap up). This helps shield and render the fat, resulting in a more flavorful and tender meat.
5. Cooking Time: The cooking time for brisket can vary depending on factors such as size, temperature, and personal preference. It’s important to monitor the internal temperature with a meat thermometer and cook until it reaches an optimal temperature of around 195-205°F.
6. Resting Period: After removing the brisket from the grill, allow it to rest for at least 30 minutes before slicing. This allows the juices to redistribute within the meat, resulting in a juicier end product.
7. Experimentation: Don’t be afraid to experiment with different rubs, seasonings, and cooking methods to find what works best for your taste preferences. Barbecue is all about finding your own unique style!
Trimming the Brisket
When preparing a brisket for smoking on a Weber Kettle, it is important to trim the meat to ensure it fits on the grill grates. A good size for a brisket on a Weber Kettle is around 7-10 lbs trimmed. If you can only find larger packer briskets, you can trim off excess weight to make it fit. The most important factor when choosing a brisket is the amount of intramuscular fat, or marbling. USDA Choice or Prime Briskets are recommended as they have enough intramuscular fat to ensure tenderness and moisture in the meat. It is best to trim and season the brisket the day before smoking, but if doing it the same day, a few hours in the fridge will suffice.
Keeping things simple is key when seasoning a brisket. A mixture of cracked peppercorns, kosher salt, and either Lawry’s seasoned salt or garlic powder works well. The ratio of salt to pepper can vary depending on personal preference, with popular options being 50/50 or 1/3 salt to 2/3 pepper. Freshly cracked peppercorns are preferred over pre-cracked black pepper for more potent flavor. The amount of seasoning used should be adjusted based on personal taste preferences.
There are different methods for smoking on a charcoal grill like the Weber Kettle, such as using the Slow N’ Sear attachment or the snake method. The Slow N’ Sear attachment makes reloading charcoal easier but both methods can achieve great results. Vent adjustment is important to control temperature during smoking, with a target range of 225-275F. Starting with a small amount of lit charcoal and gradually adjusting dampers helps maintain temperature control. Placing the brisket in the indirect zone of the grill, with the fat side facing the fire and the fat cap up, allows for even cooking. Minimal lid opening is recommended to maintain consistent temperature and smoke flavor. Adding wood chunks, such as cherry or post oak, throughout the smoking process enhances flavor and adds a nice color to the meat.
During smoking, it is important to monitor the temperature of the meat using a lid thermometer or a meat probe inserted into the thickest part of the brisket. The internal temperature should reach around 203F for optimal tenderness. Once cooked, allow the brisket to rest for at least 30 minutes before slicing against the grain. Serve with your favorite barbecue sauce or enjoy it as is for a delicious smoked brisket on a Weber Kettle.
Applying Rub to the Brisket
Once the brisket has reached the desired color, it’s time to apply the rub. For my briskets, I like to keep things simple with cracked peppercorns, kosher salt, and either Lawry’s seasoned salt or garlic powder. You can adjust the amounts based on your personal taste preferences.
Some people prefer to use 16-mesh ground black pepper for better bark formation, but I find that freshly cracked peppercorns offer a more potent flavor. The choice between kosher salt brands like Morton’s and Diamond Crystal is up to personal preference as well – they both work fine.
To apply the rub, simply sprinkle it evenly over all sides of the brisket. Make sure to cover every inch of meat for maximum flavor. You can also gently pat the rub into the meat to help it adhere better.
Setting Up the Weber Kettle to Smoke
When smoking a brisket on a Weber kettle, it is important to ensure that the meat fits on the grill grates. A good size for a brisket on a Weber kettle is around 7-10 lbs trimmed. If you have a larger packer brisket, you can trim it down to fit.
The most important factor in choosing a brisket is the amount of intramuscular fat or marbling. Look for USDA Choice or Prime Briskets as they have enough intramuscular fat. Avoid using Select grade as it tends to dry out.
Trim and season your brisket the day before smoking. Keep the seasoning simple with cracked peppercorns, kosher salt, and either Lawry’s seasoned salt or garlic powder. You can adjust the amounts based on your preference.
There are different methods to smoke on a charcoal grill like the Weber kettle. The Slow N’ Sear attachment makes things easier, but you can also use the snake method. Set up the charcoal with unlit charcoal on one side and lit charcoal on the other side for indirect cooking.
Adjust the vents on the Weber kettle to maintain a temperature range of 225-275F. Start with both dampers open and adjust as needed to control airflow and temperature. Use a separate thermometer placed above the food to monitor cooking temperature.
Place the brisket in the cool zone of the grill with the fat side facing towards the fire. Add wood chunks for smoke flavor, such as cherry, pecan, or post oak. Limit opening the lid to minimize heat loss during cooking.
Setting Up Vents to Smoke
When smoking a brisket on a Weber Kettle, it’s important to set up the vents properly to maintain the desired temperature range of 225-275F. The vents on a Weber Kettle give you control over three things: airflow, oxygen intake, and fire intensity.
To start, you only need a small amount of lit charcoal. If using a chimney starter, about 10 briquettes or 1/4 chimney of lump charcoal is sufficient. Place the lit charcoal on one side of the grill and add unlit charcoal next to it so that it self-ignites.
Both the intake and exhaust dampers should be fully open at the beginning to maximize airflow and draft in the smoker. As the smoker starts to come up to around 200F, you can adjust the intake damper to control the amount of oxygen entering the smoker. Roughly 1/4 to an 1/8 open should achieve a temperature range of 225-275F.
Leave the exhaust damper completely open throughout the smoking process. This allows for proper ventilation and smoke escape. It’s important to note that lid thermometers on Weber Kettles are often positioned incorrectly for smoking, so using an additional thermometer placed above the food or dangling a meat probe into the exhaust damper can provide more accurate temperature readings.
Putting the Brisket on The Weber Kettle
When smoking a brisket on a Weber Kettle, it is important to consider the size of the meat. A good size for a brisket on a Weber Kettle is around 7-10 lbs trimmed. If you can only find larger packer briskets, you can trim them down to fit on the grill grates.
The most important factor to consider when choosing a brisket is the amount of intramuscular fat or marbling. USDA Choice or Prime Briskets are recommended as they have enough intramuscular fat to ensure tenderness and moisture in the meat. Avoid using Select grade briskets as they tend to dry out.
Before smoking, it is recommended to trim and season the brisket the day before. This allows for easier preparation on the day of smoking. Simple seasonings like cracked peppercorns, kosher salt, and garlic powder can be used, but feel free to get creative with rubs.
Checking on the Brisket
After about 5 hours of smoking, it’s time to check on the brisket. At this point, you should start to see the meat developing a beautiful color. The fat cap on top should be rendering and becoming crispy. Resist the temptation to open the lid too frequently, as this will slow down the cooking process. Remember, if you’re lookin’, you ain’t cookin’.
Take a quick peek inside to see how things are progressing. You can use a meat thermometer to check the internal temperature of the brisket. It should be around 160-170°F at this stage. This is when you’ll start to see the “stall” phenomenon, where the temperature seems to plateau for a while before continuing to rise.
If you notice any areas that are browning too quickly or getting too dark, you can rotate or reposition the brisket to ensure even cooking. Keep adding wood chunks for smoke flavor every hour or so. Remember, fruit woods like cherry add a nice touch of color and flavor.
Continue monitoring the temperature and appearance of the brisket until it reaches an internal temperature of around 195-205°F. This is when the collagen in the meat breaks down and becomes tender, resulting in juicy and succulent brisket.
Remember, cooking times can vary depending on factors like size and thickness of your brisket, ambient temperature, and even your specific grill setup. Use your judgment and rely on internal temperature as a guide rather than strict time guidelines.
Once your brisket is done, remove it from the grill and let it rest for at least 30 minutes before slicing into it. This allows the juices to redistribute throughout the meat for maximum flavor and tenderness.
Enjoy your deliciously smoked brisket from your trusty Weber kettle!
Wrapping or Foil Boating the Brisket

After around 5 hours of smoking, you can choose to wrap or foil boat your brisket. Wrapping the brisket helps to retain moisture and speeds up the cooking process. You can use either butcher paper or aluminum foil for this step.
To wrap the brisket, lay out a large sheet of butcher paper or aluminum foil and place the brisket in the center. Fold the edges over tightly to create a sealed package. This will help trap in steam and keep the meat moist.
Foil boating is a similar method where you tightly wrap the brisket in aluminum foil, creating a sealed package. This also helps to retain moisture and speeds up cooking.
Whether you choose to wrap or foil boat, return the wrapped brisket to the grill and continue cooking until it reaches your desired internal temperature. The wrapping stage usually takes around 2-3 hours, depending on the size of your brisket.
Remember to use caution when handling hot foil or paper-wrapped briskets, as they can be very hot. Use oven mitts or gloves when removing them from the grill.
Once your wrapped brisket has reached your desired internal temperature (usually around 195-205°F), carefully remove it from the grill and let it rest for at least 30 minutes before slicing. Resting allows the juices to redistribute throughout the meat, resulting in a more tender and flavorful final product.
Overall, whether you choose to wrap or foil boat your brisket is a matter of personal preference. Both methods can produce delicious results, so feel free to experiment and find what works best for you.
How to Foil Boat
To foil boat your brisket, you’ll need a large piece of aluminum foil. Start by tearing off a sheet that is long enough to completely wrap around the brisket. Place the sheet on a flat surface.
Next, carefully transfer the brisket from the grill onto the center of the foil. Be cautious as it may be hot. Fold up the sides of the foil around the brisket, creating a boat-like shape.
Once the sides are folded up, fold over each end of the foil to seal in the brisket. Make sure it is tightly wrapped to prevent any juices from leaking out.
Return the foiled brisket to the grill and continue cooking. The foil will help trap in heat and moisture, resulting in a tender and juicy final product.
It’s important to note that foiling is an optional step and not everyone chooses to do it. Some prefer to let their brisket cook uncovered for the entire duration of smoking. It ultimately comes down to personal preference.
After foiling, continue cooking until your desired level of doneness is reached. This can vary depending on factors such as size and thickness of your brisket.
Once done, remove the foiled brisket from the grill and let it rest for at least 30 minutes before slicing and serving. This resting period allows for redistribution of juices within the meat, resulting in a more flavorful bite.
Enjoy your deliciously smoked brisket!
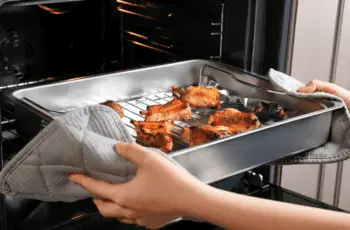
Finishing in Your Oven or Electric Smoker
If you don’t have a charcoal grill like the Weber Kettle, you can still achieve great results by finishing your brisket in an oven or electric smoker. After smoking the brisket on the Weber Kettle for about 5 hours, it’s time to transfer it to your chosen cooking device.
For the oven method, preheat your oven to 225°F. Carefully remove the brisket from the grill and wrap it tightly in aluminum foil. Place the wrapped brisket on a baking sheet and place it in the preheated oven. Cook for an additional 4-6 hours, or until the internal temperature of the brisket reaches around 200°F. This low and slow cooking method will help break down the collagen and make the meat tender and juicy.
If you’re using an electric smoker, follow the manufacturer’s instructions for preheating and setting up your smoker. Transfer the smoked brisket to a clean aluminum pan or a foil-wrapped pan. Place the pan in the electric smoker and continue cooking at 225°F for another 4-6 hours, or until reaching an internal temperature of around 200°F.
Regardless of whether you choose to finish in an oven or electric smoker, it’s important to monitor the internal temperature of the brisket using a meat thermometer. Once it reaches around 200°F, remove it from heat and let it rest for at least 30 minutes before slicing and serving.
Remember that these are just alternative methods if you don’t have access to a Weber Kettle or prefer using other cooking devices. The key is to cook low and slow to achieve tender and flavorful brisket that will impress your guests.
Resting Your Brisket

After the brisket is done cooking, it is important to let it rest before slicing into it. Resting allows the juices to redistribute throughout the meat, resulting in a more tender and flavorful brisket. I recommend resting the brisket for at least 30 minutes, but up to an hour is even better.
During the resting period, you can loosely tent the brisket with foil to keep it warm. This also helps retain moisture. It’s important not to wrap it too tightly, as this can cause the crust (bark) to become soggy.
Once the resting period is over, you can begin slicing your brisket against the grain. This ensures that each slice will be tender and easy to chew. Serve your delicious smoked brisket with your favorite barbecue sauce or enjoy it as is.
Remember, smoking a brisket on a Weber Kettle is not only possible but can produce incredible results. With some patience and attention to detail, you can achieve juicy and flavorful smoked brisket right in your own backyard. Enjoy!
Holding the Brisket Overnight
After smoking the brisket for several hours, it is important to properly hold and store it overnight. This allows the flavors to develop further and ensures that the meat remains tender and juicy. Here are some tips for holding the brisket overnight:
1. Remove the brisket from the grill: Once you are satisfied with the color and texture of the meat, carefully remove it from the grill using heat-resistant gloves or tongs. Place it on a clean cutting board or tray.
2. Wrap it tightly: To prevent any moisture loss and maintain its tenderness, tightly wrap the brisket in aluminum foil or butcher paper. Make sure there are no gaps or openings where air can get in.
3. Let it rest: Allow the wrapped brisket to rest at room temperature for about an hour before transferring it to the refrigerator. This helps to evenly distribute the juices throughout the meat.
4. Refrigerate overnight: Once cooled, place the wrapped brisket in a sealed container or large plastic bag and refrigerate overnight. This allows all the flavors to meld together and enhances the overall taste of the meat.
5. Reheat before serving: When you’re ready to serve, gently reheat the brisket in a preheated oven at low temperature (around 250°F) until warmed through. This will help restore its juiciness and ensure it is enjoyable for your guests.
Remember, holding a brisket overnight is not necessary but can greatly enhance its flavor profile. It also allows you to prepare ahead of time for gatherings or events without sacrificing taste or quality. Enjoy your deliciously smoked brisket!
Holding in a Cooler
After smoking the brisket for several hours on the Weber Kettle, it is important to properly hold the meat before serving. One of the best methods for holding brisket is using a cooler. This allows the meat to continue cooking and tenderizing while staying warm and moist.
To hold the brisket in a cooler, remove it from the grill when it reaches an internal temperature of around 195-205°F. Wrap the brisket tightly in foil or butcher paper to retain heat and moisture. Place the wrapped brisket in a clean cooler and fill any empty spaces with towels or blankets to provide insulation.
The brisket can be held in the cooler for several hours without losing much temperature. This resting period allows the meat to relax and reabsorb its juices, resulting in a more tender and flavorful final product. It is recommended to let the brisket rest for at least one hour, but it can be held for up to four hours if needed.
When ready to serve, carefully unwrap the brisket and slice against the grain. The meat should be juicy, tender, and full of smoky flavor. Enjoy your delicious smoked brisket from the Weber Kettle!
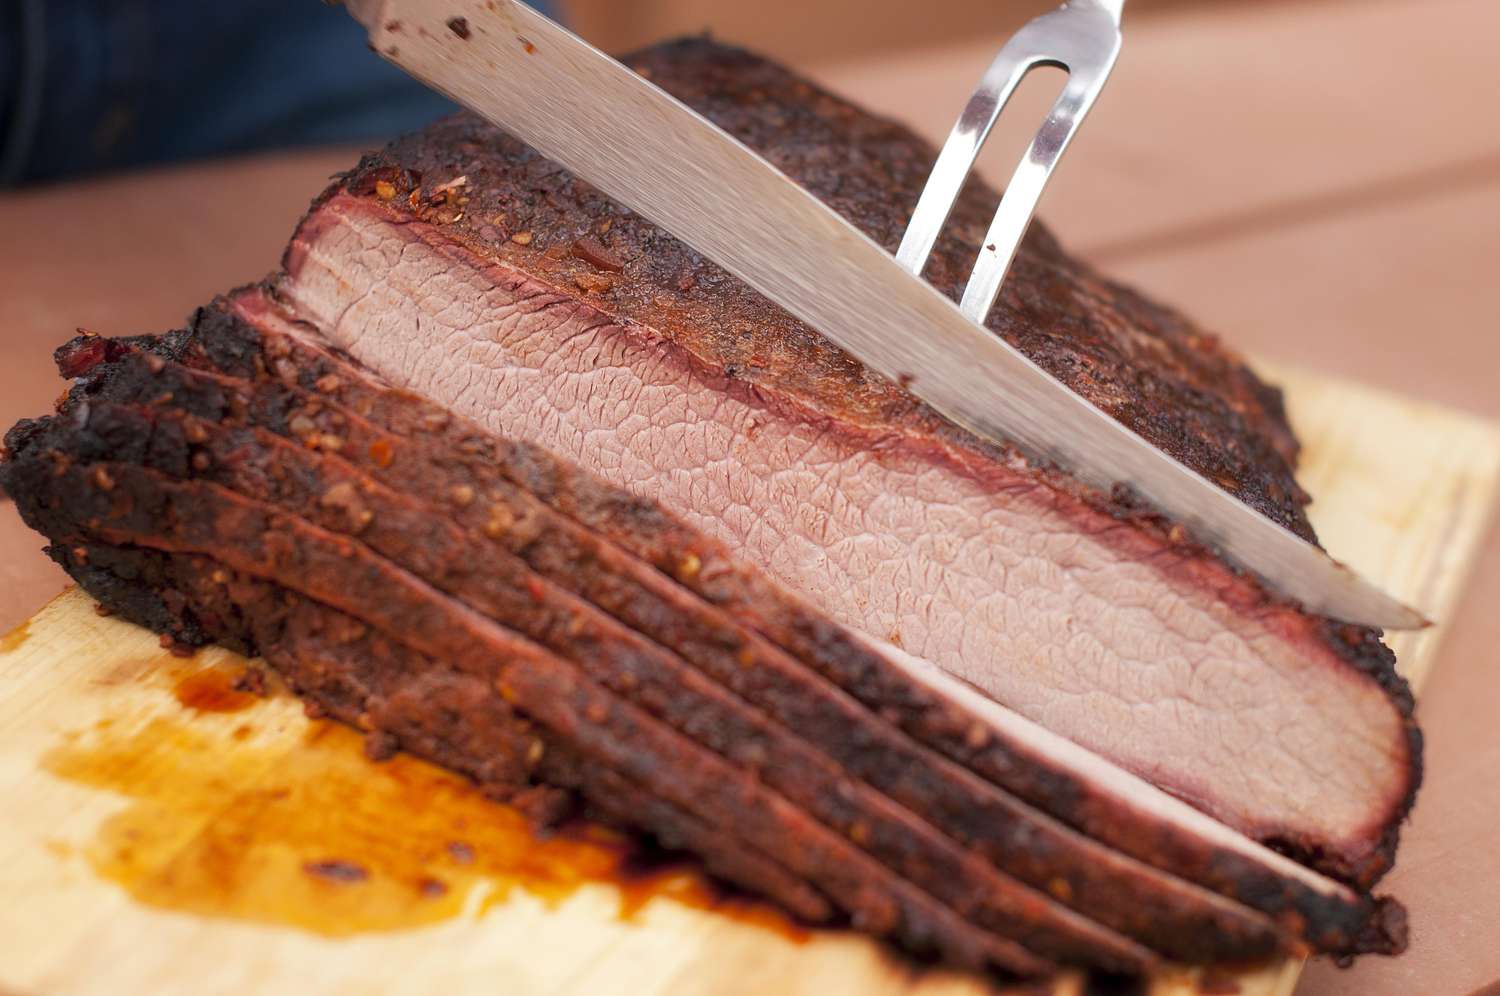
Slicing Brisket
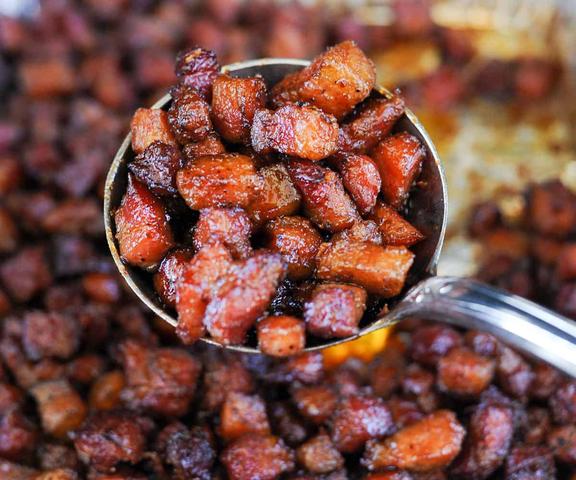
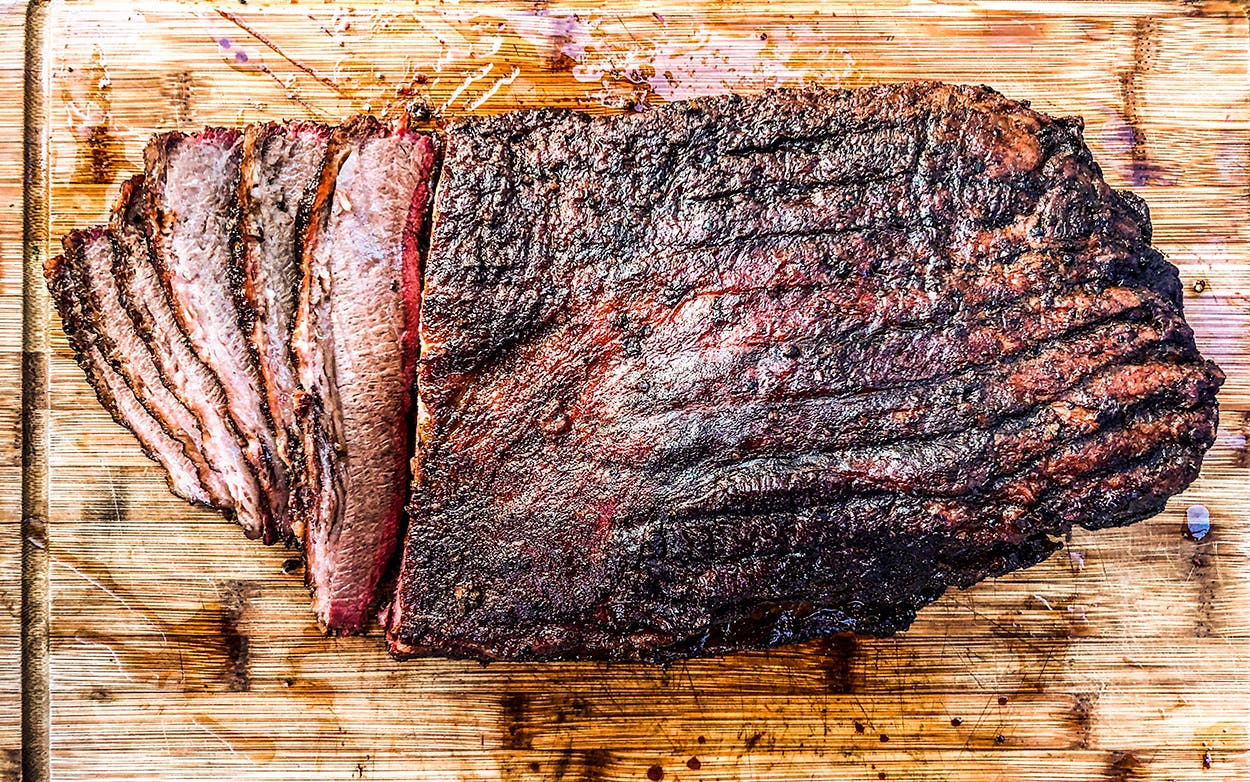
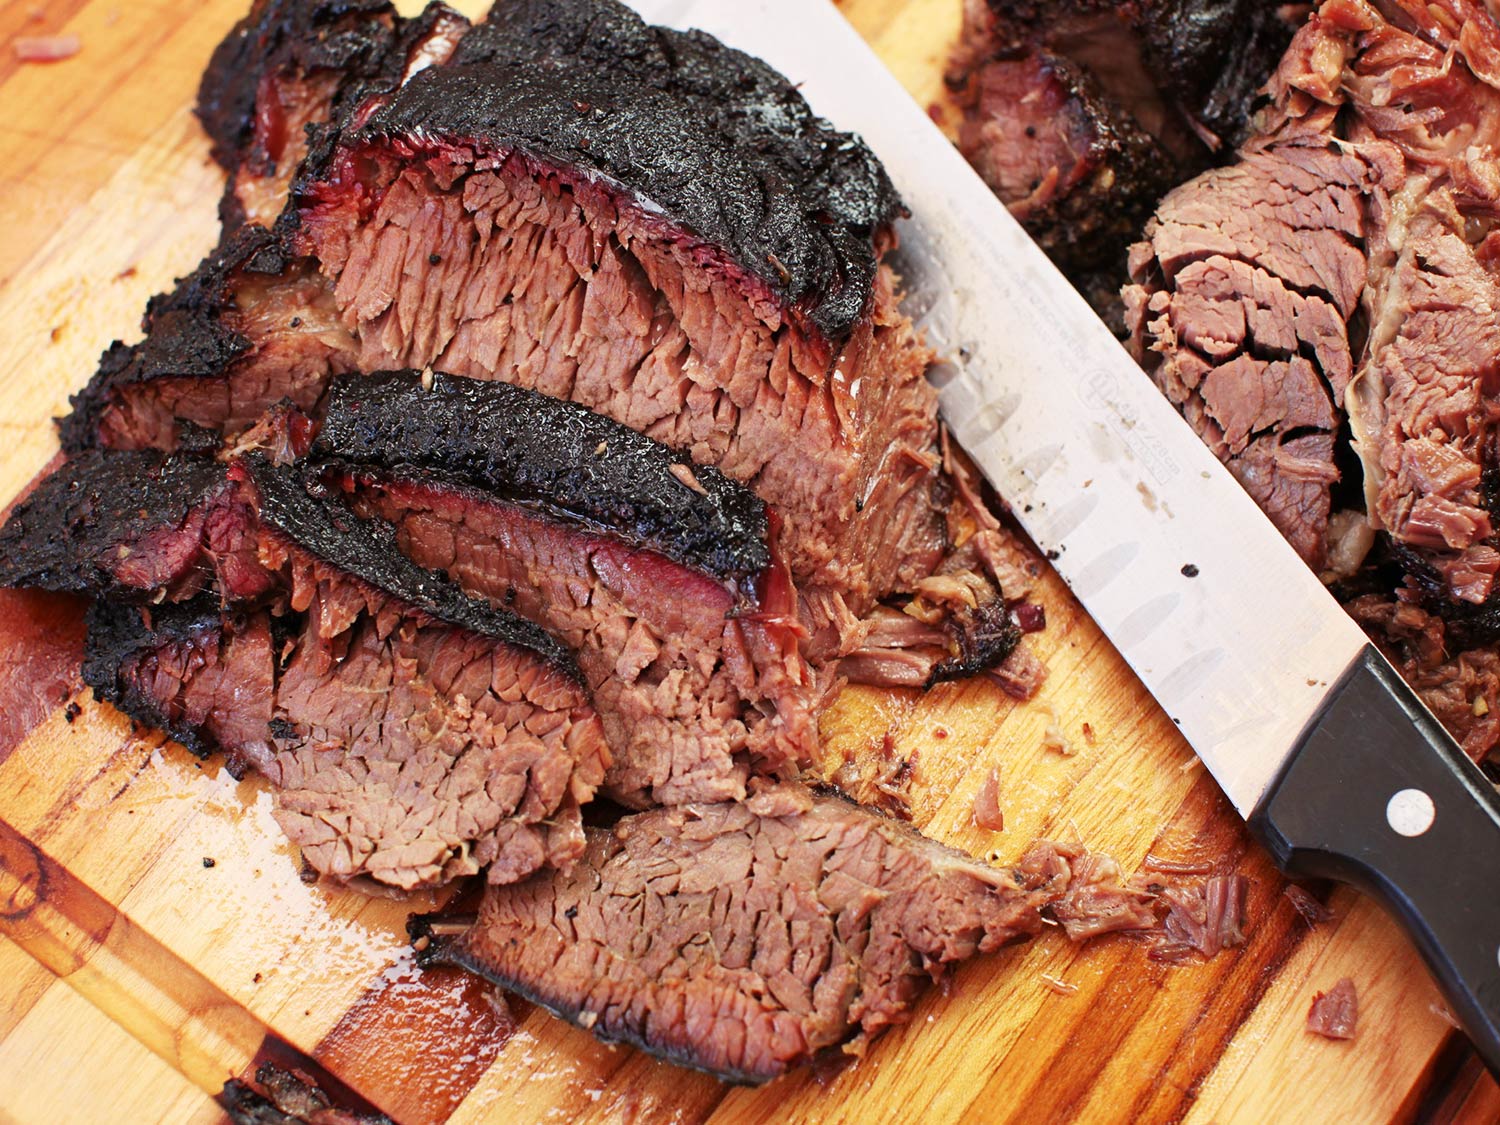
After smoking the brisket on the Weber Kettle for several hours, it is time to slice and serve. Slicing brisket requires a bit of technique to ensure that each slice is tender and juicy. Here are some tips for slicing brisket:
1. Let it rest: Before slicing the brisket, allow it to rest for at least 30 minutes. This allows the juices to redistribute throughout the meat, resulting in a more flavorful and tender slice.
2. Find the grain: Identify the direction of the grain in the meat. The grain refers to the lines or fibers running through the brisket. It is important to slice against the grain, as this will result in more tender slices.
3. Use a sharp knife: Make sure your knife is sharp before starting to slice. A dull knife can tear or shred the meat, leading to uneven slices.
4. Slice thin: Aim for thin slices of brisket, about ¼ inch thick or less. Thin slices are easier to chew and tend to be more tender.
5. Trim excess fat: If there is any excess fat on top of the brisket, trim it off before slicing. This will make for a leaner and more enjoyable eating experience.
6. Serve immediately: After slicing, serve the brisket immediately while it is still warm and juicy.
By following these tips, you can ensure that your sliced brisket from the Weber Kettle is flavorful, tender, and a hit at any barbecue gathering.
Smoked Brisket on the Weber Kettle Recipe
To smoke a brisket on the Weber Kettle, you’ll need a brisket that fits on the grill grates, preferably around 7-10 lbs trimmed. Look for a brisket with enough intramuscular fat, which can be determined by buying a USDA Choice or Prime Brisket. Avoid using Select grade as it tends to dry out. Trim and season the brisket the day before smoking, or at least 1-2 hours in advance.
For seasoning, keep it simple with cracked peppercorns, kosher salt, and either Lawry’s seasoned salt or garlic powder. Adjust the amounts based on your preference. Set up the charcoal grill using methods like the Slow N’ Sear attachment or snake method. Aim for a smoking temperature range of 225 – 275F by adjusting the dampers.
Place the brisket in the cool zone of the grill with the fat side facing the fire and fat cap up. Use wood chunks like cherry, post oak, hickory, or pecan for added smoke flavor. Avoid opening the lid frequently to maintain consistent cooking temperature. Smoke the brisket for several hours until it reaches your desired level of tenderness and color.
Equipment
– Weber Kettle grill
– Charcoal chimney
– Slow N’ Sear attachment (optional)
– Tel-tru thermometer (optional)
– Cherry wood chunks or other smoking wood
– Meat probe thermometer
Ingredients
– Brisket (7-10 lbs trimmed)
– USDA Choice or Prime Brisket
– Cracked peppercorns
– Kosher salt
– Lawry’s seasoned salt or garlic powder
– Fruit wood chunks (e.g. cherry, hickory, pecan, post oak)
Dry Rub
When it comes to the dry rub for the brisket, I like to keep things simple. I usually use cracked peppercorns, kosher salt, and either Lawry’s seasoned salt or garlic powder. You can get creative and experiment with different rubs, as brisket is a large cut of meat that can handle various flavors. Some people prefer using 16-mesh ground black pepper for better bark formation, but I personally prefer freshly cracked peppercorns for a more potent flavor.
There are different methods to smoke on a charcoal grill like the Weber kettle. One popular method is the snake method, where you arrange unlit charcoal in a circle around the edge of the grill and place lit charcoal on one end to allow it to slowly ignite the unlit charcoal. Another option is using accessories like the Slow N’ Sear attachment, which makes it easier to control temperature and reload charcoal.
To control the temperature in your smoker, you have three main factors: the amount of lit charcoal, intake damper (which controls airflow), and exhaust damper. Start with a small amount of lit charcoal and gradually adjust the intake damper to achieve a temperature range of 225-275F. Leaving the exhaust damper completely open helps with smoke ventilation.
Once your smoker reaches your desired temperature range, place the trimmed brisket in the indirect zone of your grill with the fat side facing towards the fire. The fat cap acts as a shield for the meat and renders better when placed towards heat source from above. Use wood chunks or chips for added smoke flavor – fruit woods like cherry work well with beef and pork.
Remember not to open the lid too often while smoking as it can affect cooking time and temperature consistency. Only open the lid when necessary, such as adding more wood chunks or adjusting temperature. This will help maintain a steady cooking environment for your brisket.
Overall, smoking a brisket on a Weber kettle is completely doable and can produce delicious results. With the right techniques and attention to detail, you can achieve tender and flavorful brisket without needing an offset smoker.
Instructions
1. Choose a brisket that will fit on your Weber Kettle grill grates, around 7-10 lbs trimmed. Trim off excess fat and protein to make it fit if necessary.
2. Look for a brisket with enough intramuscular fat, known as “striations” or “marbling.” USDA Choice or Prime grade briskets are recommended.
3. Trim and season the brisket the day before smoking, or at least 1-2 hours before if doing it on the same day.
4. Keep the seasoning simple with cracked peppercorns, kosher salt, and Lawry’s seasoned salt or garlic powder. Adjust amounts based on personal preference.
5. Set up the charcoal grill for smoking using either the Snake method or a Slow N’ Sear attachment.
6. Maintain a temperature range of 225 – 275F by adjusting the dampers on the grill.
7. Place the brisket in the indirect zone of the grill with the fat side facing the fire and fat cap up.
8. Use wood chunks for smoke flavor, such as cherry, post oak, pecan, or hickory.
9. Minimize lid opening to maintain consistent heat and smoke levels.
10. Smoke for several hours until desired color is achieved on the meat, usually around 5-6 hours.
11. Wrap the brisket in foil or butcher paper to continue cooking until tender and reach an internal temperature of around 200F.
12. Let the brisket rest for at least 1 hour before slicing and serving.
Note: These instructions provide a general guideline for smoking brisket on a Weber Kettle grill using basic techniques. It is always recommended to adjust based on personal preferences and experience level.
Smoking the Brisket
After prepping the brisket and setting up the charcoal grill, it’s time to start smoking the brisket. Place the brisket in the indirect zone of the grill, with the fat side facing the fire and the fat cap up. This positioning helps shield and render the fat properly.
Add wood chunks to create smoke flavor. Fruit woods like cherry work well for brisket and can be paired with other woods like hickory, pecan, or post oak for added depth of flavor. Minimize opening the lid to maintain consistent temperature and avoid releasing heat.
Monitor the temperature using a lid thermometer or by dangling a meat probe into the exhaust damper. Aim for a temperature range of 225-275F above the food. Adjust intake dampers to control airflow and maintain desired temperature.
Add more wood chunks every hour or so for continuous smoke flavor infusion. Avoid peeking too often as it disrupts cooking consistency. The brisket will gradually develop a desirable color and bark as it cooks.
Around 5 hours into smoking, you should start noticing that the meat is nearing its desired color. At this point, you can continue smoking until it reaches your preferred level of tenderness or use a meat thermometer to check for doneness.
Remember that backyard barbecue is not a competition, so don’t worry too much about minor imperfections or variations in cooking times. The most important thing is that your guests enjoy tender and moist brisket when it’s ready to be served.
Resting the Brisket / Holding the Brisket
After smoking the brisket on the Weber Kettle for several hours, it is important to allow it to rest before serving. Resting the brisket allows the juices to redistribute throughout the meat, resulting in a more tender and flavorful final product.
To rest the brisket, remove it from the grill and wrap it tightly in aluminum foil or butcher paper. Place it in a cooler or insulated container to keep it warm. The brisket should rest for at least 1 hour, but can be held for up to 4 hours if needed.
During this resting period, the internal temperature of the brisket will continue to rise slightly as residual heat continues to cook it. This is known as carryover cooking. It is important not to skip this step, as it can greatly impact the texture and moisture of the final product.
Once rested, carefully unwrap the brisket and slice against the grain for optimal tenderness. Serve immediately and enjoy!
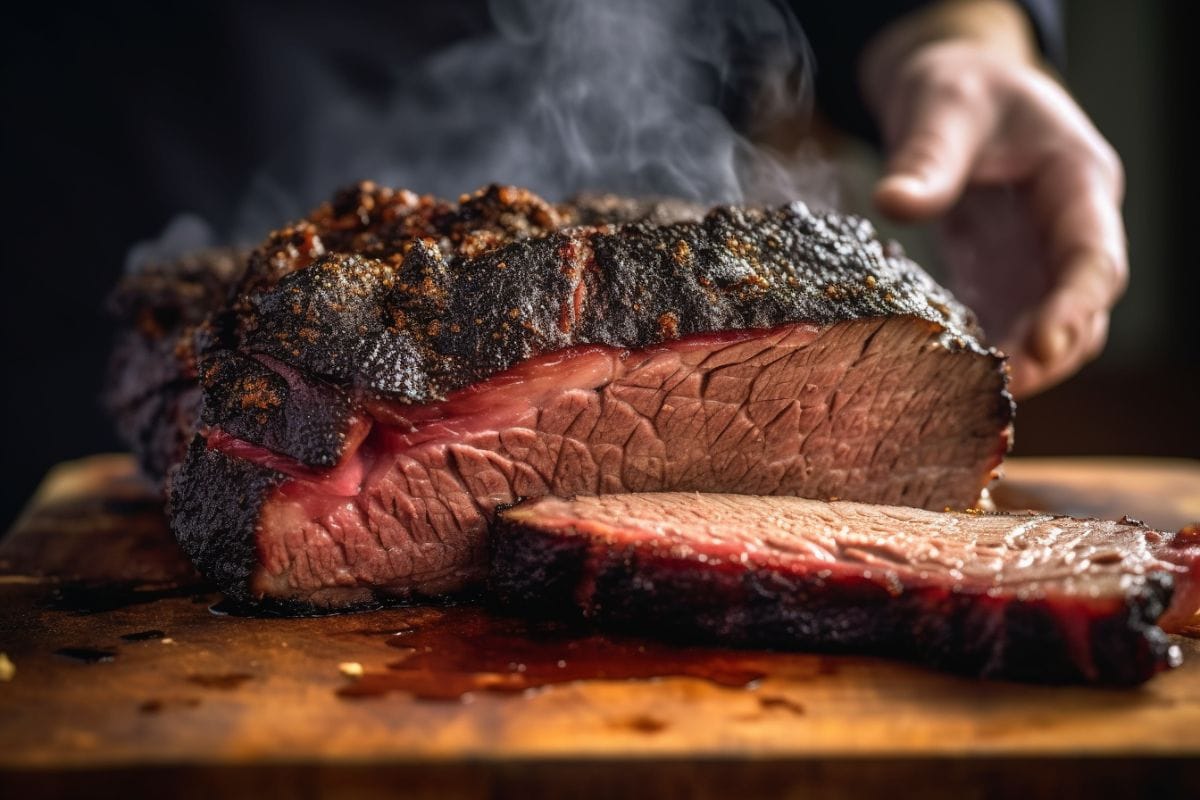
Slicing the Brisket
After smoking the brisket for several hours, it is finally time to slice and serve it. Slicing the brisket properly is crucial to ensure tender and flavorful meat. Here are some tips for slicing the brisket:
1. Let it rest: Before slicing, allow the cooked brisket to rest for at least 30 minutes. This allows the juices to redistribute throughout the meat, resulting in a more moist and tender end result.
2. Find the grain: Identify the direction of the grain on the brisket. The grain refers to the lines or fibers running through the meat. It’s important to cut against the grain, which means cutting perpendicular to these lines. This helps break up those tough muscle fibers and makes each bite more tender.
3. Start with the flat: Begin by slicing from the leaner flat portion of the brisket. Use a sharp knife and make thin slices across the grain. Aim for slices that are about ¼ inch thick.
4. Move to the point: Once you’ve sliced through most of the flat, transition to slicing through the fattier point portion of the brisket. Again, cut against the grain in thin slices.
5. Serve with sauce: Brisket pairs well with barbecue sauce or other condiments like pickles or coleslaw. Serve your sliced brisket with your favorite accompaniments and enjoy!
Remember, practice makes perfect when it comes to slicing brisket. Don’t worry if your first few slices aren’t perfect – as long as they taste delicious, that’s what matters most!
In conclusion, cooking brisket on a Weber kettle grill is a fantastic way to achieve tender and flavorful results. The combination of indirect heat and smoke infusion creates a deliciously smoky bark and juicy meat. With proper technique and patience, you can master the art of brisket on your Weber kettle, impressing family and friends with mouthwatering barbecue every time.
Learn More About Grilling
If you want to learn more about grilling, check out these other helpful resources!