“Uncover the Secrets of Rib Wrapping: A Comprehensive Guide to Perfectly Cooked Ribs”
No Wrap Ribs Recipe: The How and Why Explained
When it comes to smoking ribs, many recipes call for wrapping them in foil or butcher paper. However, wrapping isn’t necessary and some people prefer the taste and texture of “no wrap ribs.” Wrapping the ribs softens the bark, which is the crunchy exterior of the meat. Wrapping also helps combat moisture loss and speeds up the cooking time.
Wrapping with aluminum foil traps moisture and heat, while butcher paper still traps some moisture. Some people even add liquids like apple juice or vinegar to further speed up cooking time. However, not wrapping your ribs will take longer to cook than wrapped ribs.
The difference in taste between wrapped and unwrapped ribs is subjective. Some people prefer the crunchiness of the bark that comes with not wrapping, while others find little difference in taste. It’s important to note that cooking times can vary depending on factors like smoker temperature and the thickness of the ribs.
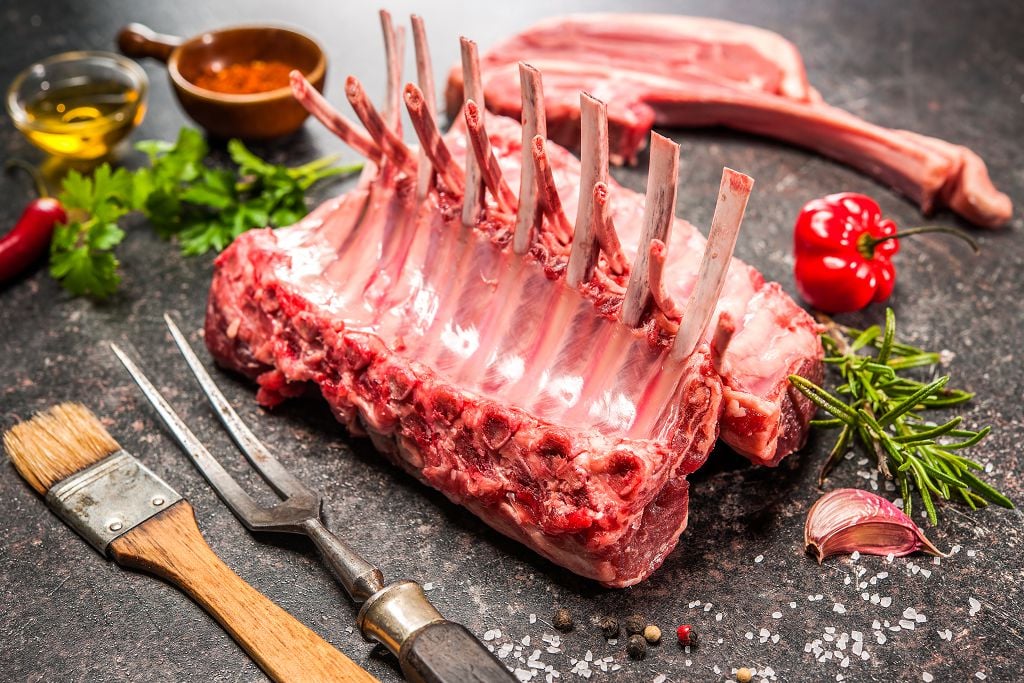
To prepare no wrap ribs, start by removing the membrane from the back of the ribs. Then apply a rub consisting of kosher salt, black pepper, and garlic powder. Smoke the ribs at a temperature between 250-275F and add wood chunks every hour for three hours for added smoke flavor.
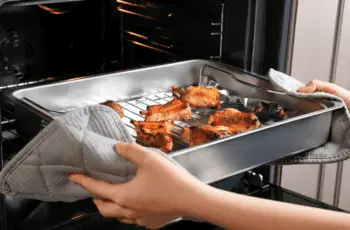
When determining if the ribs are done, you can use tests like the bend test (ribs should bend at a 45-degree angle), tear test (meat should cleanly pull away from bone), or probe test (probe should glide through like hot butter). Once tender, remove from smoker and let rest for 15 minutes before serving.
Sauce can be added during resting or returned to the smoker for a glaze if desired. Slice between bones and enjoy your flavorful no wrap ribs!
Why People Opt to “No Wrap” Their Ribs
Many people choose to not wrap their ribs when smoking because they prefer a crunchy, pellicle-like bark on the exterior of the meat. Wrapping ribs in foil or butcher paper can soften the bark. Wrapping is often used to combat the moisture-wicking properties of the meat and speed up cooking time, but since ribs are not a thick cut of meat and do not have a tendency to stall, wrapping is not necessary for this purpose.
Wrapping with non-porous materials like aluminum foil effectively traps moisture and heat, while butcher paper is porous but still retains moisture and heat. Some people also use wrapping as an opportunity to introduce liquids like apple juice or apple cider vinegar, as well as sugars like honey or dark brown sugar, which can further speed up cooking time by braising the meat.
The cook time for no wrap ribs will generally be longer compared to wrapped ribs. Factors such as smoker temperature and individual racks of ribs can affect cook time. However, taste-wise, there may not be a significant difference between wrapped and unwrapped ribs. The preference for wrapping or not can vary among individuals.
Why Do People Wrap Ribs?
Wrapping ribs has become a common practice in many recipes, but it is not necessary for smoking ribs. The main reason people wrap ribs is to speed up the cooking process. Wrapping with aluminum foil or butcher paper traps moisture and heat, helping to cook the meat faster.
Another reason for wrapping is to combat the moisture-wicking properties of the meat. When meat sweats, it can dry out and lose flavor. Wrapping helps retain moisture and keep the meat tender.
Some people also use wrapping as an opportunity to introduce liquids like apple juice or apple cider vinegar, as well as sugars like honey or brown sugar. These liquids can further enhance the flavor and tenderness of the ribs.
However, not everyone prefers wrapped ribs. Some people enjoy a crunchy bark on their ribs, which can only be achieved by not wrapping them. Wrapping tends to soften the exterior bark of the meat.
How Much Longer Do No Wrap Ribs Take?
When smoking ribs without wrapping them in foil or butcher paper, they will generally take longer to cook compared to wrapped ribs. The exact cooking time can vary depending on factors such as the temperature of your smoker and the size of the ribs. On average, not wrapping your ribs can add an additional 45-90 minutes to the cooking process.
In the example provided by the author, baby back ribs took 6 hours and 10 minutes to reach tenderness when not wrapped, compared to 5 hours and 30 minutes when wrapped in aluminum foil. However, it’s important to note that every rack of ribs is different, so cooking times may vary.
While not wrapping your ribs may result in a slightly longer cook time, some people prefer this method because it allows for a crunchy bark on the exterior of the meat. Wrapping with foil or butcher paper can soften the bark to some degree. Ultimately, whether you choose to wrap your ribs or not depends on your personal preference for texture and taste.
Do No Wrap Ribs Taste Better?
While opinions may vary, the taste difference between no wrap ribs and wrapped ribs is generally negligible. Some people prefer the crunchy bark that forms on no wrap ribs, while others enjoy the tenderness that comes from wrapping the meat. Ultimately, it comes down to personal preference.
In my experience, I have found that the difference in taste between wrapped and unwrapped ribs is minimal. However, my Dad, who enjoys a crunchy exterior bark followed by tender meat, believes that no wrap ribs taste better. On the other hand, my Mom finds them to be about the same as always – bite off the bone, smoky, and tender.
How to Smoke No Wrap Ribs
When smoking ribs without wrapping, there are a few key steps to follow. First, remove the membrane from the back of the ribs using a butter knife and spoon. This will help the rub and smoke penetrate the meat more effectively.
Next, prepare your rib rub by combining kosher salt, black pepper, and garlic powder in a bowl. Apply this rub generously to both sides of the ribs.
Once your smoker has reached a temperature of 250-275F, place the ribs on the grates. Add chunks of hardwood, such as cherry or pecan, to provide a smoky flavor. Every hour for three hours, add more wood chunks for continuous smoke infusion.
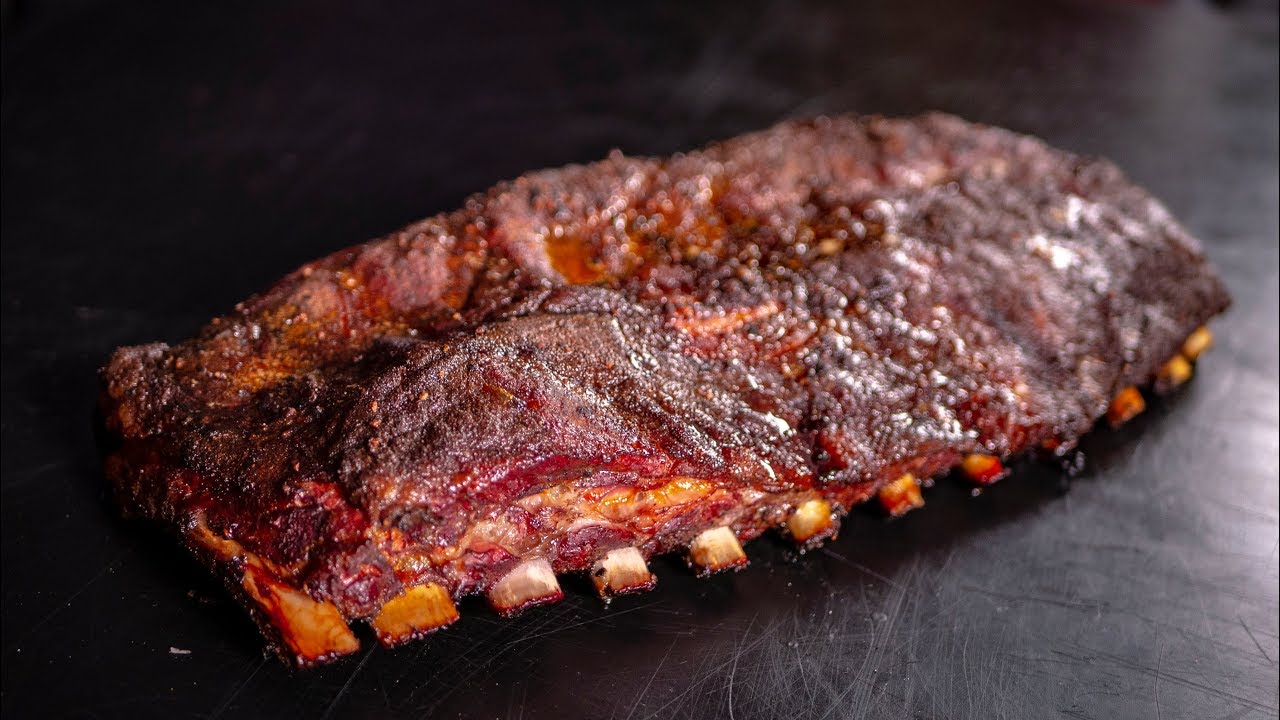
Monitor the tenderness of the ribs using tests like the bend test and tear test. The ribs should have a deep red mahogany color and be tender enough to bend at a 45-degree angle. The meat should also easily pull away from the bone.
Once the ribs are tender, remove them from the smoker and allow them to rest for 15 minutes. During this time, you can sauce them with your preferred barbecue sauce if desired. Optionally, you can return them to the smoker for 10-15 minutes to glaze the sauce.
Slice between the bones and enjoy your smoked no wrap ribs!
Prepping the Ribs
To prepare the ribs, start by removing the membrane from the back of the ribs. Use a butter knife to lift the membrane and then continue with a spoon until it is fully lifted. Once lifted, use a paper towel to grip and rip the membrane horizontally along the ribs. Discard the membrane in the trash.
In a bowl, combine the rib rub ingredients in the specified quantities: 1 tablespoon Diamond Crystal Kosher Salt, 1 tablespoon 16 Mesh Black Pepper, and 1 teaspoon Garlic Powder. Apply this rub to both sides of the ribs.
Once your smoker has stabilized at a temperature of 250-275F, place your seasoned ribs on the grates. Add a chunk of hardwood, such as cherry or pecan, to provide smoke flavor. Every hour for 3 hours, add another chunk of hardwood to maintain smoke throughout cooking.
To determine when your ribs are done, you can use various tests. The bend test involves picking up the ribs at about the fifth rib and allowing the other ribs to bend – if they bend at a 45 degree angle, they are done. You can also do a tear test near a bone in the center – if the meat cleanly pulls away from the bone, it is likely done. Lastly, you can probe between the bones with a probe or toothpick – if it glides through like hot butter, they are likely done. The internal temperature should be around 190-205F.
After removing from the smoker, allow your ribs to rest for 15 minutes. During this time, the juices will gelatinize and the bones can be easily held. Avoid tenting with foil to prevent moisture buildup and softening of the bark. If desired, you can sauce your ribs with your choice of barbecue sauce during this resting period. Optionally, you can return the sauced ribs to the smoker for 10-15 minutes to glaze the sauce.
Once rested and sauced, slice between the bones of the ribs and enjoy!
Putting Dry Rub on Ribs
Before smoking your ribs, it’s important to apply a dry rub to enhance the flavor. In this recipe, a simple mixture of kosher salt, black pepper, and garlic powder is used. Combine these ingredients in a bowl and then generously apply the rub to both sides of the ribs. It’s important to ensure that every inch of the meat is coated with the rub for maximum flavor.
To smoke the ribs, you will need a smoker such as a Weber Kettle. Start by lighting your charcoal using a charcoal chimney. Once the coals are hot and ready, arrange them in your smoker and add a chunk of hardwood for flavor. For this recipe, cherry wood works best with pork ribs.
Place your seasoned ribs on the grates of the smoker and close the lid. Maintain a temperature range of 250-275°F throughout the cooking process. Every hour for 3 hours, add another chunk of hardwood to keep producing smoke and infuse flavor into the ribs.
The key to perfectly cooked ribs is achieving tenderness. There are several ways to determine when your ribs are done cooking. One method is the bend test – pick up the ribs at about the fifth rib and let them bend naturally. If they reach a 45-degree angle without breaking or resistance, they are likely done.
You can also perform a tear test near one of the bones in the center of the rack. If the meat cleanly pulls away from the bone without much effort, it is cooked to perfection.
An alternative method is probing between the bones with a probe or toothpick. If it glides through like hot butter, your ribs are likely tender enough to be considered done.
Once your ribs have reached the desired tenderness, it’s time to remove them from the smoker and let them rest for 15 minutes. During this resting period, the juices in the meat will gelatinize, making the ribs even more flavorful and juicy.
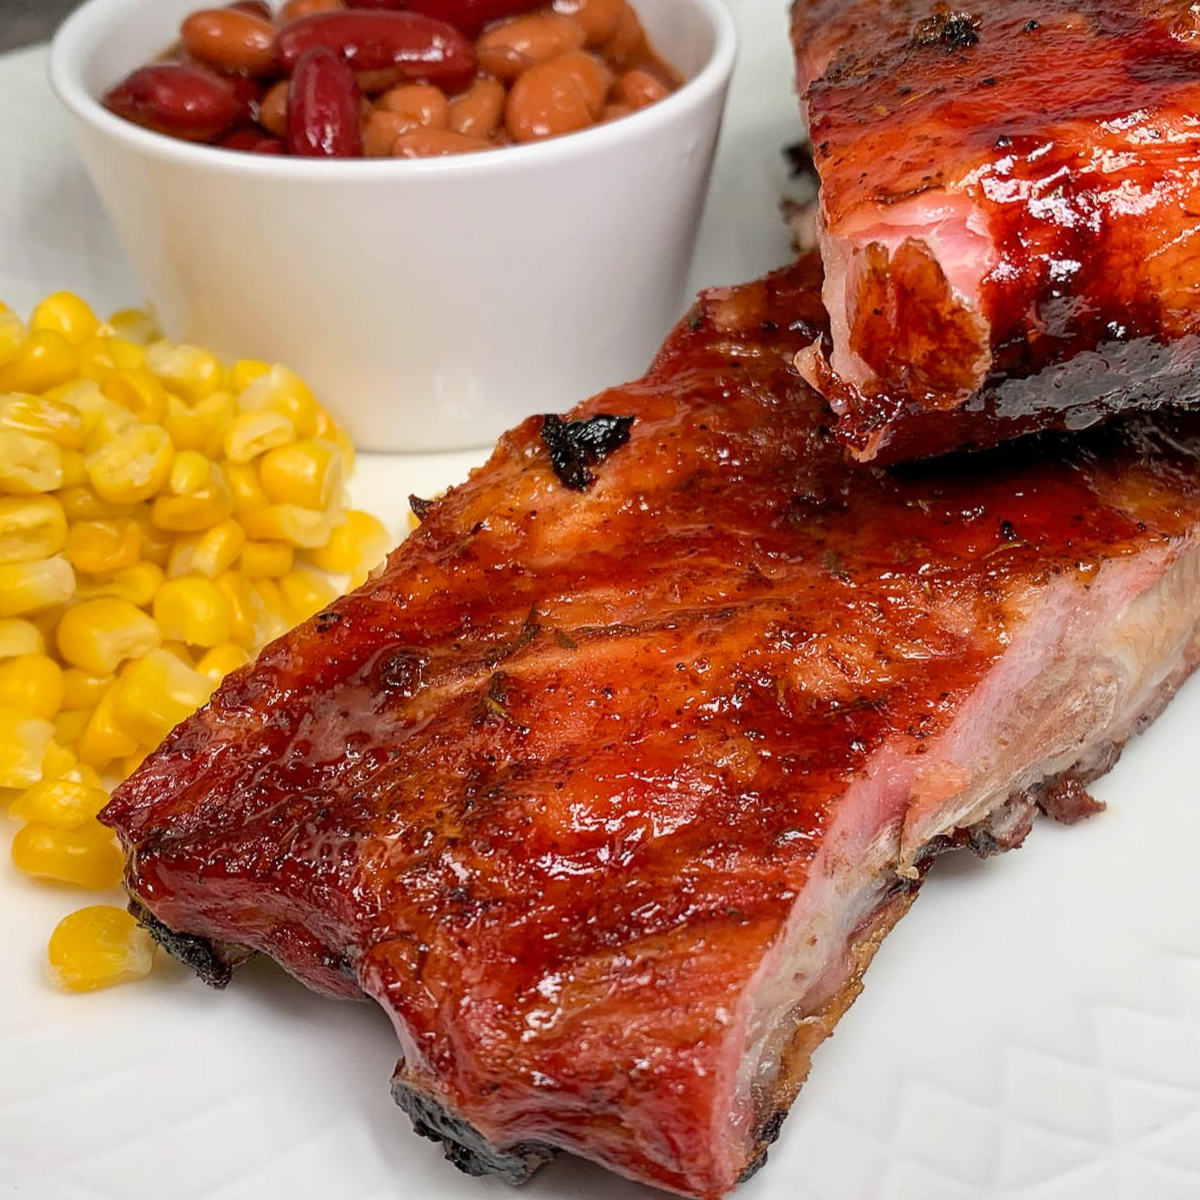
You can choose to sauce your ribs during this resting period. Apply your favorite barbecue sauce, such as Sweet Baby Ray’s Honey BBQ Sauce, to both sides of the ribs. If you prefer a glazed finish, you can also return the sauced ribs to the smoker for an additional 10-15 minutes.
After resting and saucing your ribs, it’s time to slice between the bones and enjoy! The result should be tender, flavorful ribs with a delicious bark on the outside. Serve them as they are or alongside your favorite side dishes for a complete meal.
Putting the Ribs on the Smoker
To start, remove the membrane from your ribs by using a butter knife to lift it and a spoon to continue lifting without tearing. Once lifted, use a paper towel to rip it off horizontally and discard it.
In a bowl, combine the rib rub ingredients in the specified quantities: 1 tablespoon Diamond Crystal Kosher Salt, 1 tablespoon 16 Mesh Black Pepper, and 1 teaspoon Garlic Powder. Apply this rub to both the front and back of the ribs.
Once your smoker has stabilized at a temperature between 250-275F, place your seasoned ribs on the smoker grates. Add a chunk of hardwood, such as cherry or pecan wood, to provide smoke flavor. Every hour for 3 hours, add another chunk of hardwood to maintain consistent smoke.
Use the bend test and tear test to determine when your ribs are done. The ribs should bend at about a 45-degree angle and the meat should cleanly tear away from the bone. Tender ribs will typically have an internal temperature between 190-205F.
Once your ribs are tender, remove them from the smoker and allow them to rest for 15 minutes. During this time, you can sauce your ribs with your choice of barbecue sauce, such as Sweet Baby Ray’s Honey BBQ Sauce. Optionally, you can return them to the smoker for an additional 10-15 minutes to glaze the sauce.
After resting and saucing, slice between the bones of your ribs and serve. Enjoy the smoky, tender, and flavorful ribs!
Checking on the Ribs
Checking on the Ribs:
When smoking no wrap ribs, it’s important to periodically check on their progress. One method of checking is the bend test. Simply pick up the ribs at about the 5th rib and allow the other ribs to bend. If they’re bending at a 45-degree angle, they’re likely done. Another test is to do a tear near a bone in the center. If the meat cleanly pulls away from the bone, it’s likely done. You can also probe between the bones with a toothpick or probe thermometer. If it glides through like hot butter, they’re likely done.
Additionally, some people use temperature as an indicator of doneness, although it can vary depending on the rack of ribs. Some may finish at 190°F while others may need to reach 205°F. In this case, these ribs were deemed done when probing at 201°F.
Once you’ve determined that the ribs are done, it’s time to take them off the smoker and allow them to rest for about 15 minutes. During this resting period, the juices will gelatinize and you’ll be able to hold the bones in your hands without burning yourself.
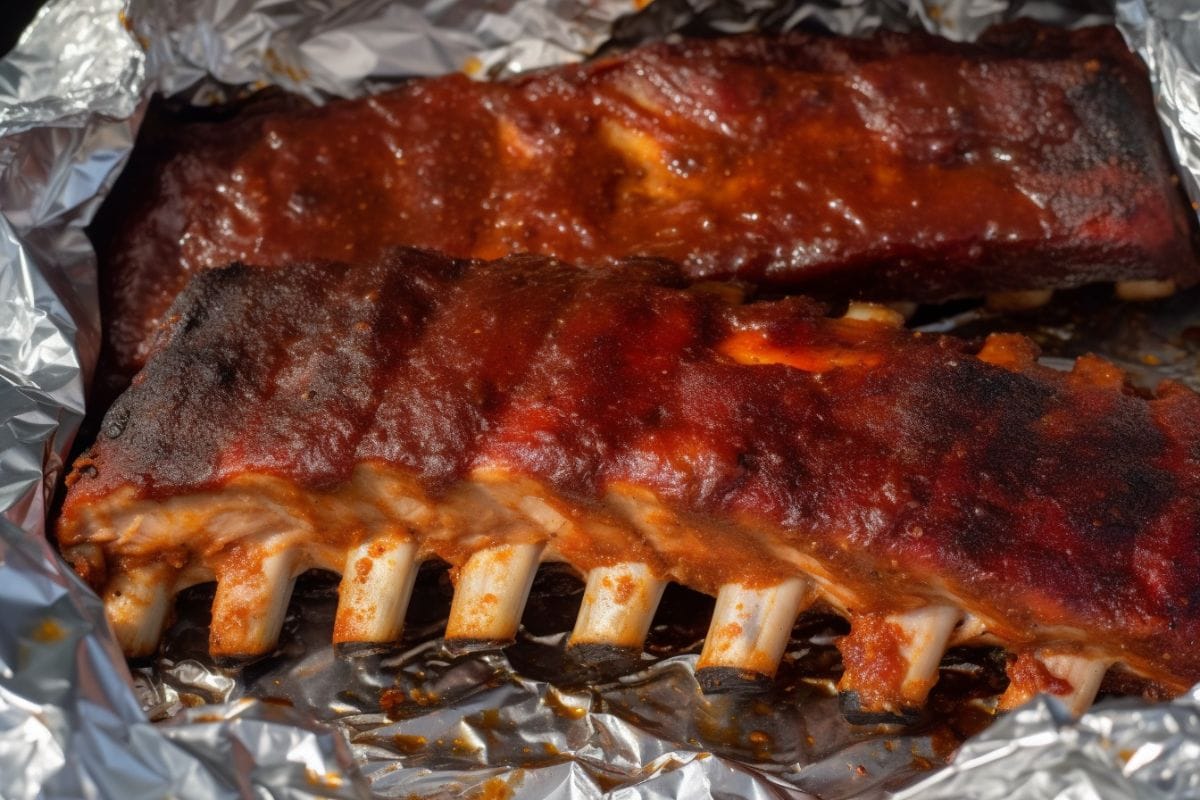
It’s worth mentioning that during this resting period, there’s no need to tent the ribs with foil as this would only build up moisture and soften the bark that you’ve worked hard to achieve. Instead, you can choose to sauce your ribs with your favorite barbecue sauce if desired or return them to the smoker for an additional 10-15 minutes to glaze.
Finally, after resting and saucing (if desired), you can slice between the bones and enjoy your delicious no wrap ribs!
How to Tell When No Wrap Ribs are Done
When smoking no wrap ribs, there are a few tests you can do to determine if they are done. One method is the bend test, where you pick up the ribs at about the 5th rib and allow the other ribs to bend. If they bend at a 45-degree angle, they are likely done. Another test is to do a tear near a bone in the center of the meat. If the meat cleanly pulls away from the bone, it is likely done. You can also probe between the bones with a toothpick or probe. If it glides through like hot butter, the ribs are likely done.
Temperature can also be used as an indicator of doneness, but it’s important to note that different racks of ribs may finish cooking at different temperatures. Some may be done at 190F while others may need to reach 205F. It’s best to use temperature as a guideline rather than a definitive measure of doneness. In this recipe, the ribs were probed and deemed done when they reached an internal temperature of 201F.
Resting the Ribs
After taking the ribs off the smoker, it’s important to allow them to rest for about 15 minutes. This resting period allows the juices in the meat to gelatinize and gives you the opportunity to hold the bones in your hands without burning yourself. During this time, there is no need to tent the ribs with foil as it can build up moisture and soften the bark.
While the ribs are resting, you have the option to sauce them with your choice of barbecue sauce. In this recipe, Sweet Baby Ray’s Honey BBQ Sauce was used. Simply brush on a layer of sauce and let it sit for a little longer during the resting period. If desired, you can also return the sauced ribs to your smoker for 10-15 minutes to glaze the sauce.
After resting and saucing (and optionally glazing), it’s time to slice between the bones and enjoy your delicious smoked ribs. The meat should be tender enough that it cleanly pulls away from the bone. Serve them as they are or with additional barbecue sauce on the side for dipping.
Please note that these instructions are based on a specific recipe using baby back ribs and Sweet Baby Ray’s Honey BBQ Sauce. Feel free to customize based on your own preferences and ingredients available.
No Wrap Ribs
When smoking ribs, many recipes call for wrapping them in aluminum foil or butcher paper. However, wrapping is not necessary and some people prefer “no wrap ribs” for the crunchy bark they provide. Wrapping with foil or butcher paper softens the bark and speeds up the cooking time. Wrapping also helps trap moisture and heat, which can be further enhanced by adding liquids like apple juice or vinegar.
Not wrapping your ribs will take longer to cook compared to wrapped ribs. Factors like smoker temperature and individual rack of ribs can affect the cooking time. In a recipe example, wrapped baby back ribs took 5 hours and 30 minutes at 225-250°F, while unwrapped ribs took 6 hours and 10 minutes at 250-275°F. The difference in taste between wrapped and unwrapped ribs is subjective, with some people preferring the crunchier exterior bark of unwrapped ribs.
To prepare no wrap ribs, remove the membrane from the back of the ribs using a butter knife and spoon. Apply a rub consisting of kosher salt, black pepper, and garlic powder. Smoke the ribs at a temperature range of 250-275°F using hardwood chunks like cherry wood for added flavor. Use tests like the bend test, tear test, and toothpick probe to determine when the ribs are tender enough to be done.
After removing from the smoker, let the rested ribs sit for 15 minutes without tenting them with foil to avoid softening the bark. Optionally, sauce your ribs with barbecue sauce before slicing between the bones and serving.
Equipment
For this recipe, you will need the following equipment:
- A smoker – The author used a Weber Kettle for this recipe.
- Charcoal – B&B lump charcoal and B&B briquettes were used in this recipe.
- Charcoal chimney – This is needed to light the charcoal.
- Pork Ribs – Baby back ribs were used in this recipe, but you can use any type of pork ribs.
- Rib rub – The author used Diamond Crystal Kosher Salt, 16 mesh black pepper, and garlic powder for the rib rub.
- BBQ Sauce – Sweet Baby Ray’s Honey BBQ Sauce was used in this recipe, but you can use any barbecue sauce of your choice.
- Start by removing the membrane from your ribs. Use a butter knife and a spoon to lift and remove the membrane horizontally along the ribs.
- In a bowl, combine the rib rub ingredients (kosher salt, black pepper, and garlic powder) in the specified quantities. Apply the rub to both sides of the ribs.
- Once your smoker has stabilized at a temperature between 250-275F, place your ribs on the smoker grates and add a chunk of hardwood (such as cherry or pecan) for smoke flavor. Every hour for 3 hours, add another chunk of hardwood to maintain smoke throughout the cooking process.
- Wait for the ribs to reach tenderness. The author recommends using the bend test (ribs should bend at a 45 degree angle) and tear test (meat should cleanly pull away from the bone) to determine when they are done. Tender ribs will have an internal temperature in the range of 190-205F.
- Once the ribs are tender, remove them from the smoker and let them rest for 15 minutes. During this time, you can add your choice of BBQ sauce to the ribs.
- Optionally, you can return the sauced ribs to the smoker for 10-15 minutes to glaze the sauce.
- After resting and saucing (and optionally glazing), slice between the bones and serve.
Please note that this is a summary of the recipe steps provided in the article. For more detailed instructions and tips, refer to the original source.
Ingredients
– Butter knife
– Spoon
– Paper towel
– Pork ribs (baby back)
– Rib rub (Diamond Crystal Kosher Salt, 16 mesh black pepper, garlic powder)
– BBQ sauce (Sweet Baby Ray’s Honey BBQ Sauce)
– Charcoal
– Charcoal chimney
Rib Rub
For this recipe, the rib rub consists of Diamond Crystal Kosher Salt, 16 mesh black pepper, and garlic powder. These ingredients are combined in a bowl and applied to both the front and back of the ribs. The specific quantities used are 1 tablespoon of kosher salt, 1 tablespoon of black pepper, and 1 teaspoon of garlic powder.
Once your smoker has stabilized at a temperature between 250-275F, place the ribs on the smoker grates. Add a chunk of hardwood, such as cherry or pecan, to the fire. Every hour for the first three hours, add another chunk of hardwood to maintain smoke flavor.
The cooking time will vary depending on factors such as smoker temperature and the size of the ribs. To determine when the ribs are done, you can use the bend test and tear test. The ribs should have a bend of about 45 degrees when lifted from one end, and the meat should easily tear away from the bone.
Once the ribs reach tenderness, remove them from the smoker and let them rest for 15 minutes. During this time, you can add your choice of barbecue sauce to glaze the ribs. If desired, you can also return them to the smoker for an additional 10-15 minutes to further enhance the sauce’s flavor.
After resting and saucing, slice between the bones and enjoy your flavorful no wrap ribs!
Instructions
1. Start by removing the membrane from the back of the ribs. Use a butter knife to lift it and a spoon to continue lifting without tearing. Once lifted, use a paper towel to rip it off horizontally. Discard the membrane.
2. In a bowl, combine the ingredients for the rib rub: 1 tablespoon Diamond Crystal Kosher Salt, 1 tablespoon 16 Mesh Black Pepper, and 1 teaspoon Garlic Powder. Apply the rub to both sides of the ribs.
3. Preheat your smoker to a temperature between 250-275°F. Add a chunk of hardwood, such as cherry or pecan, every hour for the first three hours of smoking.
4. Smoke the ribs until they reach tenderness. You can use the bend test and tear test to determine when they’re done. The ribs should bend at a 45-degree angle, and the meat should easily tear away from the bone.
5. Once tender, remove the ribs from the smoker and let them rest for 15 minutes. There’s no need to tent them with foil during this time, as it can soften the bark.
6. If desired, sauce your ribs with your choice of barbecue sauce during the resting period or return them to the smoker for an additional 10-15 minutes to glaze with sauce.
7. After resting and saucing (if desired), slice between the bones and enjoy your delicious no wrap ribs!
In conclusion, while it is not necessary to wrap ribs when cooking them, it can enhance the tenderness and flavor of the meat. Wrapping ribs in foil helps retain moisture and speeds up the cooking process, resulting in deliciously juicy and tender ribs. However, personal preferences may vary, and experimenting with different methods is always encouraged to find what works best for you.
Learn More About Grilling
If you want to learn more about grilling, check out these other helpful resources!