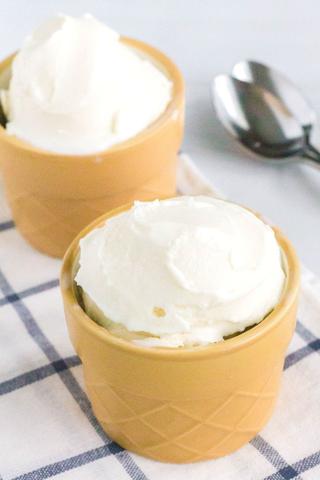
Introducing Ninja Creami Vanilla Ice Cream Recipe – Indulge in the heavenly delight of homemade vanilla ice cream that is sure to satisfy your sweet tooth cravings. With the help of Ninja Creami, a powerful kitchen appliance, you can effortlessly create this creamy and flavorful treat in no time. Get ready to enjoy a delightful blend of rich vanilla flavors, smooth texture, and irresistible taste with our easy-to-follow recipe. Elevate your dessert game with this Ninja Creami Vanilla Ice Cream Recipe and impress your family and friends with a delectable frozen treat like no other!
Ninja Creami Vanilla Ice Cream Recipe
The Ninja Creami Vanilla Ice Cream Recipe is a simple and delicious way to make homemade ice cream in just minutes. With just 5 ingredients and about 5 minutes of your time, you can create a creamy and flavorful vanilla ice cream that serves as a great base for endless variations.
To make the Ninja Creami Vanilla Ice Cream, start by combining softened cream cheese, sugar, and vanilla extract in a mixing bowl. Whisk until smooth. Then, pour in heavy cream and milk, whisking again to combine everything together. Transfer the mixture into the Creami pint jar and freeze it for 24 hours.
Once frozen, remove the pint jar from the freezer and secure it in the blending jar of the Ninja Creami machine. Select the ice cream setting with the dial and press it to start blending. After 2 minutes, remove the blending jar from the machine.
If desired, you can add in any toppings or mix-ins by creating a hole in the center of the ice cream and placing them inside. Return the blending jar to the machine and press the add-ins button.
For optimal texture, it is recommended to let the ice cream sit at room temperature for about 10 minutes before serving. If your ice cream turns out powdery due to being too cold, simply put it back into the machine and run the Re-Spin cycle for a creamier consistency.
Ingredients You Need
– Cream cheese (softened)
– White sugar
– Vanilla extract
– Heavy whipping cream or half and half
– Whole milk
Equipment Needed
To make this Ninja Creami Vanilla Ice Cream Recipe, you will need the following equipment:
1. Ninja Creami ice cream maker – This appliance is essential for making all kinds of frozen treats, including ice cream.
2. Mixing bowl – Use a mixing bowl to combine the ingredients for the ice cream base.
3. Whisk – A whisk is needed to ensure that the ingredients are well combined and smooth.
4. Creami pint jar – This jar is where you will freeze the ice cream mixture before blending it in the machine.
5. Blending jar – The blending jar is where you will mix and churn the ice cream using the Ninja Creami machine.
6. Ice cream scoop – An ice cream scoop makes it easy to serve perfectly portioned scoops of ice cream.
7. Freezer – You will need a freezer to freeze the ice cream mixture in the pint jar before blending it.
- In a mixing bowl, add softened cream cheese, sugar, and vanilla extract. Whisk together until smooth.
- Pour in heavy whipping cream and whole milk. Whisk again until all ingredients are well combined.
- Transfer the mixture into the Creami pint jar and cover with lid. Freeze for 24 hours or until completely frozen.
- Remove the frozen pint jar from the freezer and secure it in the blending jar of the Ninja Creami machine.
- Select your desired mix setting (top, bottom, or full) depending on how much of the pint jar you want to mix.
- Choose the ice cream setting on the dial and press it in to start the blending process. This will take approximately 2 minutes.
- Once blended, remove the blending jar from the machine and remove the lid. If desired, create a hole in the center of the ice cream to add mix-ins like chopped nuts, chocolate chips, or fruit.
- Place the blending jar back into the machine and press the add-ins button to incorporate any additional ingredients.
- Once fully blended and mixed with any desired add-ins, your Ninja Creami Vanilla Ice Cream is ready to be served.
- If there are leftovers, store them in the pint jar for future processing. Leftover treats may need to be processed again if they become too hard when re-frozen.
- Your homemade ice cream can be scooped using an ice cream scoop and enjoyed immediately.
Note: The recipe recommends using high-quality ingredients for optimal flavor. If your ice cream turns out powdery or not creamy enough, you can try running a Re-Spin cycle on the Ninja Creami machine. Additionally, adding crushed candies, frozen fruits, chopped nuts, or other favorite mix-ins is a great way to customize your homemade ice cream flavors!
Ninja CREAMi Deluxe
The Ninja CREAMi Deluxe is a versatile ice cream maker that allows you to create a variety of frozen treats in just minutes. With its powerful churning capabilities and additional features, it takes ice cream making to the next level. Whether you want to make traditional ice cream, gelato, sorbet, or even milkshakes and frozen yogurt, this appliance has got you covered.
The Deluxe version offers more options and functionality compared to its counterpart. It allows you to make completely customizable treats with its various settings for ice cream, slushies, Italian Ice, Creamiccinos, sorbet, milkshakes, and frozen yogurt. The blending jar securely holds the pint jar for easy mixing and add-ins.
How to Make This Ninja Creami Vanilla Ice Cream Recipe
To make this Ninja Creami Vanilla Ice Cream Recipe, start by putting the cream cheese in a mixing bowl. If it’s not softened, you can microwave it for 10 seconds to soften it. Add the sugar and vanilla extract to the bowl and whisk everything together until smooth.
Pour in the heavy whipping cream and whole milk, and whisk again to combine all the ingredients. Once everything is well mixed, pour the mixture into the Creami pint jar and cover it with the lid. Freeze it for 24 hours.
After 24 hours, remove the pint jar from the freezer and secure it in the blending jar of your Ninja Creami machine. Turn on the machine and select either top, bottom, or full depending on how much of the pint jar you want to mix. Use the dial to select the ice cream setting and press it in to start blending. It will take about 2 minutes.
Once done blending, push the button on the left side of the machine to release the blending jar. Remove the lid from the jar and if desired, add any toppings or mix-ins by creating a hole in the center of the ice cream and adding them in. Put the blending jar back into the machine and press the add-ins button.
If your ice cream turns out powdery initially, put it back in the machine and run a Re-Spin cycle to make it creamier. Enjoy your homemade Ninja Creami Vanilla Ice Cream!
Don’t Forget the Ice Cream Scoop!
If you’re making homemade ice cream, don’t forget to invest in a good ice cream scoop. The Ninja Creami Vanilla Ice Cream Recipe is so creamy and delicious that you’ll want to serve it up with ease. A heavy-duty stainless steel scoop is perfect for tackling the frozen treat. Its ergonomic design makes it easy to grip and scoop out perfect portions of ice cream every time.
For the best texture and consistency, it’s recommended to freeze the Ninja Creami Vanilla Ice Cream base for at least 24 hours. This allows the mixture to reach the optimal temperature range for processing. However, if your freezer runs colder than average, you may find that 20 hours of freezing time is sufficient. Just make sure to give it enough time to become very cold before blending.
The beauty of the Ninja Creami Vanilla Ice Cream Recipe is its versatility. Once you’ve mastered the basic vanilla base, you can get creative with mix-ins and flavor variations. Whether you prefer chopped nuts, chocolate chips, or fresh fruit, simply add them into the ice cream after blending for an extra burst of flavor and texture.
To achieve the best-tasting ice cream, it’s important to use high-quality ingredients. Opt for a good quality vanilla extract or even vanilla bean paste for a rich and authentic flavor. Additionally, using heavy whipping cream instead of half and half will result in a creamier texture. However, if you’re looking to cut back on calories and fat without sacrificing taste too much, half and half can be a suitable alternative.
If your ice cream turns out powdery or grainy in texture, don’t worry. This can happen if the ice cream is too cold. Simply put it back into the Ninja Creami and run the Re-Spin cycle. This will help break down any icy particles and make the ice cream creamier. Remember, practice makes perfect, so don’t be afraid to experiment and adjust the recipe to suit your personal preferences.
Tips for Making Great Ice Cream
1. Use high-quality ingredients: The quality of the ingredients you use will greatly impact the flavor and texture of your ice cream. Opt for fresh, high-quality cream, milk, and vanilla extract for the best results.
2. Soften the cream cheese: Make sure to soften the cream cheese before whisking it with the sugar and vanilla extract. This will ensure a smooth and creamy base for your ice cream.
3. Freeze the base for 24 hours: It’s important to freeze the ice cream base for a full 24 hours before blending it in the Ninja Creami. This will allow it to reach the optimal temperature range for churning and freezing.
4. Experiment with add-ins: Once you’ve blended your vanilla ice cream base, you can get creative with add-ins like chopped nuts, chocolate chips, or fruit. Create a hole in the center of the ice cream and add your desired toppings before blending again.
5. Re-spin if needed: If your ice cream turns out powdery or not as creamy as you’d like, you can run the Re-Spin cycle in the Ninja Creami to blend it again and achieve a smoother texture.
Ninja Creami Frequently Asked Questions

1. What is the Ninja Creami ice cream maker?
The Ninja Creami is an appliance that can make various frozen treats, including ice cream, in just minutes. It offers customizable options and features for creating different flavors and textures.
2. How does the Ninja Creami Vanilla Ice Cream Recipe work?
The recipe starts by combining softened cream cheese with sugar and vanilla extract. The mixture is then poured into the Creami pint jar and frozen for 24 hours. Afterward, the pint jar is placed in the blending jar of the Ninja Creami machine and blended for 2 minutes to create creamy vanilla ice cream.
3. Can I customize the Ninja Creami Vanilla Ice Cream Recipe?
Absolutely! The recipe serves as a base for creating different variations of ice cream. You can add toppings like chopped nuts, chocolate chips, or fruit after mixing, or adjust the recipe before freezing to make flavored ice creams like chocolate, mint, or blueberry.
4. Which version of the Ninja Creami is recommended?
The Deluxe version of the Ninja Creami is suggested because it offers more features and churning power. It allows you to make a variety of frozen treats such as slushies, Italian Ice, sorbet, milkshakes, and frozen yogurt in addition to ice cream.
5. How can I achieve a smoother texture in my ice cream?
If your ice cream turns out powdery or not as creamy as desired, you can try running the Re-Spin cycle on your Ninja Creami machine. This will help blend and smooth out the texture of the ice cream.
Do you really need to freeze it for 24 hours?
Yes, it is recommended to freeze the ice cream mixture for 24 hours before using the Ninja Creami. This allows the mixture to fully chill and solidify, resulting in a better texture and consistency when blended. The freezing process helps to create a creamy and smooth ice cream. However, if you are short on time, you can try freezing it for at least 20 hours or until it reaches a temperature between 9F and -7F.
Yes, you can use half and half instead of heavy whipping cream in this recipe. While heavy cream will produce a creamier result, using half and half will reduce the fat content slightly without sacrificing too much on taste. The ice cream may be slightly less rich and creamy, but it will still be delicious. Just make sure to use whole milk as well to maintain the desired consistency.
The vanilla ice cream recipe calls for 3/4 cup of heavy whipping cream, while the chocolate version only requires 1/2 cup. This difference in quantities is due to flavor preferences and balancing the sweetness. Using less whipping cream in the chocolate recipe helps to intensify the chocolate flavor without diluting it too much. It’s simply a ratio decision made by the recipe creator to achieve the desired taste profile.
What if my ice cream or treat turns out powdery?
If your ice cream or treat turns out powdery, it is likely because the mixture was very cold when you blended it. To fix this issue, you can put the ice cream back in the machine and run the Re-Spin cycle. This will help make the ice cream creamier and eliminate the powdery texture.
It is important to note that the quality of the ingredients used can also impact the texture of the ice cream. Using higher quality ingredients, especially a high-quality vanilla extract, can result in a smoother and creamier final product.
Additionally, if you want to experiment with different flavors or add-ins, you can create a hole in the center of the ice cream after blending and add your desired toppings or mix-ins. Simply put the blending jar back into the machine and press the add-ins button to incorporate them into the ice cream.
Overall, even if your ice cream turns out powdery initially, there are simple steps you can take to improve its texture and achieve a creamy consistency.
How much of my add-in ingredients should I add?
When it comes to adding in your favorite ingredients to the Ninja Creami Vanilla Ice Cream recipe, there is no set amount. The recipe suggests adding a total of 1/4 cup of crushed candies, frozen fruits, chopped nuts, chocolate pieces, or any other add-ins you desire. However, you have the freedom to mix and match as you like. You can even blend different add-ins for variety by adding 1/8 cup of one add-in to the top and another 1/8 cup of a different add-in to the bottom. The possibilities are endless and completely customizable to suit your taste preferences.
It’s important to note that the Deluxe pints used in this recipe hold 3 cups, so there may be leftovers. To store leftovers, it is recommended to keep them in the pint jar so they can be processed again if needed. Some treats may re-freeze very hard and require processing again before enjoying. If you transfer them to a different container, you won’t be able to reprocess them.
There is no minimum fill line for the pint jar, but it is suggested to fill it at least halfway up to achieve the best texture. Filling below this level will not harm the machine. If you prefer smaller batches, making half a recipe has been successful for some users.
Overall, feel free to get creative with your add-ins and experiment with different flavors and combinations. The Ninja Creami allows you to easily customize your ice cream creations and enjoy endless variations of delicious frozen treats!
In conclusion, this homemade ninja creami vanilla ice cream recipe offers a delightful and creamy treat that is easy to make. With just a few simple ingredients and steps, you can enjoy the rich and smooth texture of this delicious frozen dessert in the comfort of your own home. Give it a try and indulge in the ultimate vanilla ice cream experience!
Learn More About Grilling
If you want to learn more about grilling, check out these other helpful resources!