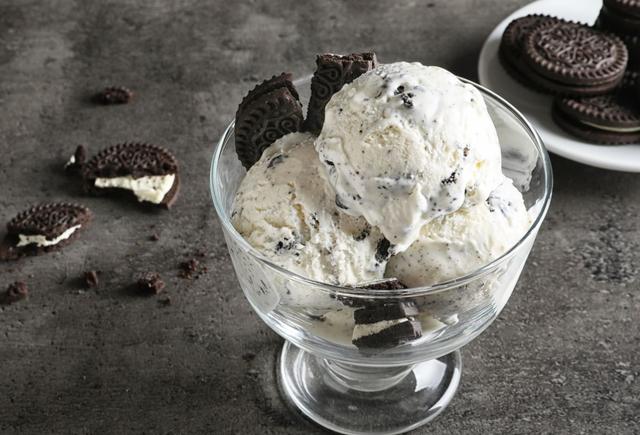
Indulge in the heavenly combination of creamy, velvety Oreo ice cream. Experience the perfect blend of rich vanilla and chunks of delectable Oreo cookies, making every bite a delightful treat. Discover pure bliss with this irresistible frozen dessert that will satisfy your sweet cravings and leave you craving for more.
Homemade Oreo Cookie Ice Cream Recipe
This Oreo Cookie Ice Cream combines your favorite chocolate cookies with creamy vanilla ice cream to make a tasty cookies and cream dessert. It uses a custard base with egg yolks for added flavor and a smooth, creamy texture.
To make this recipe, you’ll need an ice cream maker. We recommend the Cuisinart 1.5 quart ice cream maker for best results. If you don’t have an ice cream maker, you can still make this recipe by freezing the mixture in ice cube trays and blending it with the remaining ingredients in a blender.
To start, combine milk, salt, and sugar in a saucepan over medium heat. Bring it just to a simmer while stirring constantly. Remove from heat.
In a separate bowl, whisk together egg yolks and sugar until combined. Slowly add 1/2 cup of the warm milk mixture to the eggs, stirring continuously to temper them without cooking them.
Pour the tempered egg mixture back into the saucepan with the remaining milk mixture. Heat over medium heat until thickened, about 3-5 minutes. Be careful not to boil the mixture or it may curdle.
Pour the thickened mixture into a chilled bowl and refrigerate for about two hours until cold. Once cooled, stir in heavy cream and vanilla extract.
Pour the mixture into your ice cream maker and churn according to the manufacturer’s directions. After about 15 minutes of churning, add chopped Oreo cookies to blend into the ice cream.
Transfer the churned ice cream to a container and freeze for several hours or overnight until firm. Serve and enjoy!
Ingredients You’ll Need
To make this homemade Oreo Cookie Ice Cream, you will need the following ingredients:
– Oreos: Use your favorite type of Oreos, such as classic or flavored varieties.
– Heavy cream: This will give the ice cream a creamy texture.
– Whole milk: Use whole milk for richness and flavor.
– Egg yolks: These will add richness and help prevent ice crystallization.
– Sugar: You will need sugar to sweeten the ice cream base.
– Salt: A pinch of salt enhances the flavors in the ice cream.
– Vanilla extract: This adds a delicious vanilla flavor to the ice cream.
In a saucepan, combine the milk, salt, and half of the sugar. Heat the mixture over medium heat until it comes to a simmer. In a separate bowl, whisk together the egg yolks and remaining sugar. Slowly pour 1/2 cup of the hot milk mixture into the egg mixture while whisking constantly. Pour this tempered egg mixture back into the saucepan with the remaining milk mixture and cook over medium heat until thickened. Be careful not to boil.
Pour the custard-like mixture into a chilled bowl and refrigerate for about two hours until cold. Once chilled, stir in the heavy cream and vanilla extract. Transfer the mixture to an ice cream maker and freeze according to manufacturer’s instructions. After about 15 minutes, add chopped Oreos (reserving some for garnish) and continue churning for another 5 minutes or until desired consistency is reached.
Transfer the Oreo Cookie Ice Cream to a container and store in the freezer for up to a month. Enjoy!
Please note that these are just guidelines and you can adjust ingredient quantities according to your taste preferences.
What Ice Cream Maker to Use?

If you’re looking to make great ice cream at home, investing in an ice cream maker is recommended. The author suggests the Cuisinart 1.5 quart ice cream maker or the Cuisinart ICE-70 Electronic Ice Cream Maker for a more professional model. Both options produce creamy and delicious ice cream.
The recipe provided uses a custard base, which includes egg yolks. However, if you prefer not to use eggs, you can follow a vanilla ice cream base recipe and add Oreos to it.
The process of making custard-style ice cream involves several steps but is not difficult. It starts by heating milk, salt, and sugar in a saucepan until simmering. In a separate bowl, whisk together egg yolks and sugar, then slowly stir in some of the hot milk mixture to temper the eggs. This tempered egg mixture is added back into the saucepan with the remaining milk mixture and heated until thickened. The mixture is then chilled in a heat-proof bowl before adding cream and vanilla. Finally, it is poured into an ice cream maker and churned according to the manufacturer’s directions.
If you don’t have an ice cream maker, there is an alternative method provided in the recipe. After cooling the mixture completely, half of the heavy cream is mixed in and poured into ice cube trays to freeze solid. When ready to eat, the frozen cubes are blended with the remaining heavy cream until smooth.
Overall, using an ice cream maker produces superior results in terms of texture and consistency. However, there are alternatives available for those who do not have one on hand.
How to Make Oreo Cookie Ice Cream

To make Oreo Cookie Ice Cream, you will need Oreos, heavy cream, whole milk, egg yolks, sugar, salt, and vanilla extract. Start by heating the milk, salt, and half of the sugar in a saucepan over medium heat until it simmers. In a separate bowl, whisk together the egg yolks and remaining sugar. Slowly pour 1/2 cup of the heated milk mixture into the egg mixture while whisking constantly to temper the eggs. Then pour the tempered egg mixture back into the saucepan with the remaining milk mixture and cook until thickened. Remove from heat and refrigerate for about two hours.
After chilling, stir in the cream and vanilla extract. Pour the mixture into an ice cream maker and churn according to the manufacturer’s instructions. Add crushed Oreos during the last few minutes of churning. Transfer the ice cream to a container and freeze until firm.
If you don’t have an ice cream maker, you can still make this recipe by freezing half of the heavy cream with the base mixture in ice cube trays. When ready to serve, blend the frozen cubes with the remaining heavy cream until smooth.
Feel free to experiment with different flavors of Oreos or add mix-ins like chocolate chips or caramel sauce for added indulgence. Enjoy your homemade Oreo Cookie Ice Cream!
Step One: Heat the Milk Mixture
Step One: Heat the Milk Mixture
In a saucepan over medium heat, combine the milk, salt, and half of the sugar. Stir the mixture constantly as you bring it just to a simmer. Remove from heat.
Step Two: Temper the Eggs
In a small bowl, whisk together the egg yolks and remaining sugar just until combined. Slowly stir 1/2 cup of the milk mixture in a drizzle into the egg mixture to temper the eggs. Pour that egg mixture back into the saucepan with the milk mixture.
Step Three: Thicken the Mixture
Heat the saucepan over medium heat until thickened, about 3-5 minutes. Be careful not to boil the mixture, as it may result in scrambled eggs. Once thickened, pour the mixture into a heat-proof bowl.
Step Four: Cool and Refrigerate
To cool down the hot mixture more quickly, place the bowl over another bowl filled with ice for 10-15 minutes. Then refrigerate for about two hours until cold.
Step Five: Add Cream and Vanilla
After the mixture has completely cooled, stir in the heavy cream and vanilla.
Step Six: Churn and Add Oreos
Pour the ice cream base into your ice cream maker and churn according to the manufacturer’s directions. After about 15 minutes, add chopped Oreo cookies (reserving some for garnish) to blend into the ice cream. Continue churning for another 5 minutes or until desired consistency is reached.
Step Seven: Freeze and Store
Transfer the churned ice cream into a container and store it in your freezer. It can be stored for up to one month.
Note: If you don’t have an ice cream maker, you can still make this recipe by freezing half of the heavy cream with your custard base in ice cube trays. When ready to eat, blend those cubes with remaining heavy cream until smooth.
Step Two: Temper the Egg Mixture
Step Two: Temper the Egg Mixture
To temper the eggs, slowly add 1/2 cup of the milk mixture in a drizzle into the egg mixture. It is important to do this slowly so as not to cook the eggs. Pour the entire egg mixture back into the saucepan with the milk mixture. Heat over medium heat until thickened, about 3-5 minutes. Be careful not to let the mixture boil, as this could result in scrambled eggs. Remove the pot from the heat and pour the mixture into a chilled bowl. Refrigerate for about two hours until cold.
To avoid putting the hot mixture directly in the refrigerator, you can chill the bowl over another bowl filled with ice for 10-15 minutes to cool it down first. This step helps ensure that your ice cream base is properly chilled before moving on to the next step.
Step Three: Combine the Mixtures and Thicken
Step Three: Combine the Mixtures and Thicken
In a saucepan, combine the milk, salt, and half of the sugar over medium heat. Stir the mixture constantly until it comes to a simmer. Remove from heat.
To temper the eggs, slowly drizzle 1/2 cup of the milk mixture into the egg mixture while whisking continuously. This will prevent the eggs from cooking.
Pour the tempered egg mixture back into the saucepan with the milk mixture. Heat over medium heat until thickened, about 3-5 minutes. Be careful not to let it boil, as this can result in scrambled eggs.
Remove the pot from heat and pour the thickened mixture into a chilled bowl. Refrigerate for about two hours until cold. Alternatively, you can cool it down faster by placing the bowl over another bowl filled with ice for 10-15 minutes.
Once completely cooled, stir in the cream and vanilla extract.
Transfer the mixture into your ice cream maker and freeze according to its instructions. After about 15 minutes of churning, add chopped cookies (reserving some for garnish) so they can blend into the ice cream.
Continue churning for another 5 minutes or until desired consistency is reached.
Transfer the ice cream to a container and store in the freezer for up to a month. Enjoy!
Step Four: Chill the Mixture
Step Four: Chill the Mixture
After heating and thickening the milk mixture in step three, it’s time to chill it. Pour the mixture into a heat-proof bowl and refrigerate for about two hours, or until it’s cold. If you don’t want to put the hot mixture directly in the refrigerator, you can cool it down first by placing the bowl over another bowl filled with ice for 10-15 minutes. Once the mixture has completely cooled, stir in the cream and vanilla.
This chilling process is important because it allows the flavors to meld together and ensures that your ice cream will have a smooth and creamy texture. It also helps to prevent ice crystals from forming when you freeze the mixture in your ice cream maker. So be patient and let it chill thoroughly before moving on to the next step.
Step Five: Churn the Ice Cream
Step Five: Churn the Ice Cream
After the ice cream base mixture has completely cooled, it’s time to churn it in your ice cream maker. This step is important for making the ice cream freeze faster and achieve a super creamy texture.
Pour the cooled mixture into your ice cream maker and follow the manufacturer’s directions for churning. Usually, this involves turning on the machine and letting it run for a certain amount of time until the ice cream reaches the desired consistency.
About 5 minutes into churning, add the chopped Oreo cookies to the mixture. This will allow them to blend into the ice cream and create delicious cookie chunks throughout. Continue churning for another few minutes or until the ice cream is thick and creamy.
Once done, transfer the churned ice cream into a freezer container or loaf pan. You can also reserve some chopped Oreos to sprinkle on top as a garnish. Place the container in the freezer to allow the ice cream to fully set and harden before serving.
Enjoy your homemade Oreo Cookie Ice Cream straight from your own kitchen!
Don’t Forget the Ice Cream Scoop!
Don’t Forget the Ice Cream Scoop!
Having a good ice cream scoop is essential for serving up delicious scoops of homemade ice cream. This heavy-duty stainless steel scoop is not only easy to grip, but it also makes scooping a breeze. With its sturdy construction, you can easily dig into frozen ice cream without straining your hand or wrist. Whether you’re serving up classic flavors like vanilla or trying out new creations like Oreo Cookie Ice Cream, this scoop will ensure that each scoop is perfectly formed and ready to enjoy.
Investing in a quality ice cream scoop is worth it for any ice cream lover. It makes serving and enjoying your favorite frozen treats even more enjoyable. So don’t forget to add this handy tool to your kitchen arsenal!
More Ice Cream Flavors To Try

If you’re looking for more delicious ice cream flavors to try, here are some suggestions:
- Strawberry: Add fresh strawberries to your ice cream base for a refreshing and fruity flavor.
- Mint Chocolate Chip: Add mint extract and chocolate chips to create a classic and refreshing combination.
- Rocky Road: Mix in marshmallows, chopped nuts, and chocolate chunks for a rich and indulgent treat.
- Salted Caramel: Drizzle homemade salted caramel sauce into your ice cream for a sweet and salty delight.
- Peanut Butter Swirl: Swirl creamy peanut butter into your ice cream base for a rich and nutty flavor.
These are just a few ideas to get you started. The possibilities are endless when it comes to creating your own unique ice cream flavors!
Have You Heard Of The Ninja CREAMi?

The Ninja CREAMi is a versatile kitchen gadget that allows you to make a variety of frozen treats at home. It offers 11 different functions, including ice cream, gelato, sorbet, and frozen yogurt. The Deluxe version of the Ninja CREAMi has additional features and more churning power, making it a great option for those who want to experiment with different flavors and textures.
With the Ninja CREAMi, you can create completely customizable frozen desserts, from classic flavors like chocolate and vanilla to more unique combinations. The machine is easy to use and provides consistent results every time. Whether you’re craving a creamy ice cream or a refreshing sorbet, the Ninja CREAMi has got you covered.
If you don’t have an ice cream maker, there’s still a way to make homemade ice cream without one. You can mix the ingredients together and pour them into ice cube trays to freeze. Once frozen, blend the ice cream cubes with some additional liquid (such as heavy cream) until smooth and creamy. This method may take a bit longer than using an ice cream maker, but it can still yield delicious results.
Overall, whether you choose to use an ice cream maker or the Ninja CREAMi, making homemade ice cream allows you to customize flavors and enjoy a creamy treat whenever you want.
Ninja CREAMi Deluxe

The Ninja CREAMi Deluxe is a versatile kitchen gadget that allows you to make a variety of frozen treats at home. With 11 different functions, including ice cream, gelato, sorbet, and frozen yogurt, this machine offers endless possibilities for creating delicious desserts. The Deluxe model is recommended as it has additional features and churning power compared to the standard version.
Using the Ninja CREAMi Deluxe is simple and convenient. You can customize your ice cream by adding your favorite mix-ins or flavors. The machine churns the mixture, making it freeze faster and resulting in a super creamy texture. If you don’t have an ice cream maker, you can still make this recipe by freezing the mixture in ice cube trays and blending it with the remaining ingredients when ready to eat.
Eggs are an important ingredient in homemade ice cream as they add flavor, prevent ice crystallization, and create a smooth and creamy texture. While this recipe uses eggs, you can also make eggless ice cream by following alternative recipes that don’t include eggs.
Frequently Asked Questions

1. Does this ice cream have to be made in an ice cream maker?
No, you can still make this ice cream without an ice cream maker. After mixing in only half of the heavy cream, pour the mixture into ice cube trays and freeze until solid. When ready to eat, add the ice cream cubes to a blender with the remaining heavy cream and blend until smooth.
2. Can I make this recipe without eggs?
Yes, you can make this recipe without eggs by following a different vanilla ice cream base and adding the Oreos to it.
3. Can I substitute the dairy ingredients with non-dairy alternatives?
We haven’t tried it yet, but it should work fine to substitute the dairy ingredients with non-dairy alternatives like almond milk and coconut cream.
4. Can I leave the mixture in the refrigerator for longer than 2 hours?
Absolutely! You can chill the mixture for a few days with no problems.
Does this ice cream have to be made in an ice cream maker?
No, this ice cream can be made without an ice cream maker. The recipe provides instructions on how to make it using an ice cream maker, but if you don’t have one, you can still make the ice cream by pouring the mixture into ice cube trays and freezing until solid. Once frozen, blend the ice cream cubes with the remaining heavy cream until smooth.
Making it without an ice cream maker may result in a slightly different texture, but it will still be delicious and creamy.
Do I have to add eggs to the ice cream?
No, you don’t have to add eggs to the ice cream. The recipe provides an alternative vanilla ice cream base without eggs that you can use instead. However, adding eggs to the ice cream can enhance the flavor, prevent ice crystallization, and create a smooth and creamy texture. It’s a personal preference whether or not to include eggs in your homemade ice cream.
What Oreos to use for ice cream?
When making Oreo ice cream, you can use whichever type of Oreos you prefer. The classic Oreo cookies are a popular choice, but there are also many different flavors available now, such as Toffee Crunch, Chocolate Peanut Butter Pie, Carrot Cake, and Lemon. You can experiment with different flavors to change the overall taste of your ice cream.
The type of Oreos you choose will affect the flavor profile of the ice cream. For example, using mint-flavored Oreos instead of regular ones can add a refreshing twist to the dessert. Feel free to get creative and try different flavors to find your favorite combination.
In summary, you have a variety of options when it comes to choosing Oreos for your homemade ice cream. Whether you stick with the classic flavor or explore new variations, the choice is yours to make!
In conclusion, Oreo ice cream is a delectable treat that combines the irresistible flavors of cookies and cream. Its creamy texture, crunchy cookie bits, and sweet vanilla base make it a perfect indulgence for dessert lovers of all ages. Whether enjoyed in a cone, cup, or as an accompaniment to other desserts, Oreo ice cream is sure to satisfy any craving for a delightful frozen treat.
Learn More About Grilling
If you want to learn more about grilling, check out these other helpful resources!