“Master the Art of Creating a Perfect Crust on Steak with These Expert Tips!”
How to Get Crust on Steak: Popular Methods Explored
One method to get a better crust on your steak is to pull the steak at a measured internal temperature below your desired temperature. This means that you cook the steak until it reaches a temperature slightly lower than what you want it to be when you eat it. This allows for carryover cooking, where the residual heat continues to cook the steak after it has been removed from the heat source. By doing this, you can ensure that the internal temperature of the steak reaches your desired doneness without overcooking the exterior and losing the crust.

Another important factor in achieving a better crust on your steak is the thickness of the steak. Thicker steaks will build better crusts because they have more surface area for Maillard reactions to occur. The Maillard reactions are chemical reactions that happen between amino acids (proteins) and simple sugars when exposed to high heat. These reactions result in new flavors, aromas, and colors, which contribute to a better eating experience. Thicker steaks also allow for a longer cooking time, which helps in developing a thicker and more substantial crust.
The type of oil used for searing also plays a role in creating a good crust on steak. Oils with high smoke points, such as grapeseed oil, are ideal for searing because they can withstand high temperatures without breaking down and releasing acrid flavors or free radicals. Using oils with low smoke points, like extra virgin olive oil or butter, can result in burnt flavors and compromised taste. It’s important to choose an oil with a high smoke point that suits your preference.
What is the Crust on Steak?
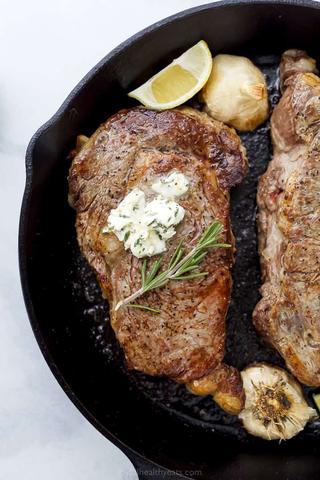
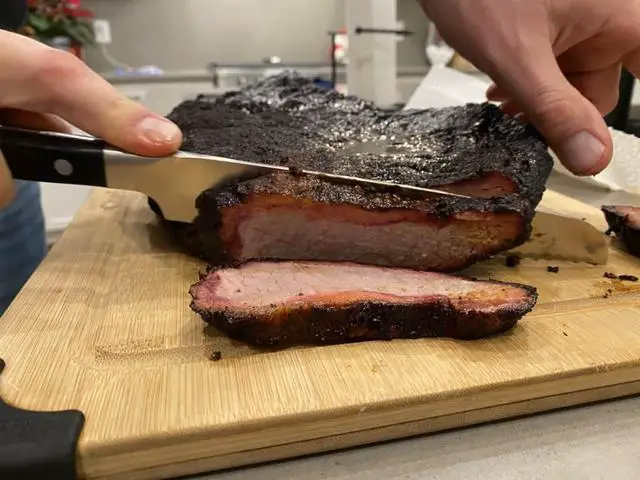
The crust on a steak is the browned exterior that forms during cooking. It is the result of chemical reactions known as the Maillard reactions, which occur between amino acids (proteins) and simple sugars. These reactions create new flavors, aromas, and colors, enhancing the eating experience.
Thicker steaks tend to build better crusts because they have more surface area for the Maillard reactions to occur. If a steak is too thin, by the time a decent crust forms, the internal temperature may have already overshot the desired range. Ideally, 1 to 2-inch thick steaks are recommended for achieving a good crust while maintaining desired doneness.
To sear a steak and develop a crust, it is important to use an oil with a high smoke point. Oils like Extra Virgin Olive Oil (EVOO) and butter have lower smoke points and can break down at high temperatures, affecting flavor and releasing undesirable compounds. Grapeseed oil is often recommended for searing as it has a higher smoke point and doesn’t affect taste.
Using a cast-iron skillet or similar flat top cookware can help achieve a better crust on a steak. Cast iron heats evenly and retains heat well, allowing for even cooking and browning. It is important not to make the skillet too hot, as this can cause burning rather than browning.

Before seasoning the steak with salt and pepper, it is recommended to pat dry the surface first to remove excess moisture. This helps promote better contact between the meat and cooking surface for proper browning. Dry brining can also be done in advance but should be given enough time for the moisture to evaporate before cooking.
Basting or moistening the steak during cooking using the arroser method can also help enhance crust formation. This method involves spooning hot oil or melted butter over the steak as it cooks, promoting browning and adding flavor.
Overall, achieving a good crust on a steak involves using the right thickness of steak, choosing an oil with a high smoke point, using the proper cookware, and ensuring the surface is dry before seasoning. These techniques can help create a flavorful and textured crust that enhances the enjoyment of the steak.
1. Steak Thickness
Thicker steaks will build better crusts because they allow for a longer searing time without overcooking the internal temperature. A minimum thickness of 1 inch is recommended, but thicker steaks (around 1.5 – 2 inches) will result in an even better crust and a more flavorful eating experience.
To achieve a better crust on your steak, it’s important to pull the steak at a measured internal temperature below your desired finishing temperature. This allows for carryover cooking to bring the steak to the desired doneness while still maintaining a crispy crust. Aim for a rare to medium-rare finish and ensure that the thermal center of the steak falls within this range.
The brown crust on a steak is formed through chemical reactions known as Maillard reactions. These reactions occur between amino acids (proteins) and simple sugars (fructose, lactose, and glucose) when exposed to high heat above 285F. Thicker steaks provide more surface area for these reactions to occur, resulting in a more pronounced and flavorful crust.
Using an oil with a high smoke point is crucial for achieving a good crust on your steak. Oils like extra virgin olive oil or butter have low smoke points and can break down at high temperatures, leading to undesirable flavors and aromas. Grapeseed oil is recommended due to its higher smoke point (around 390F) and neutral taste.
While cooking steaks on a charcoal grill with the reverse sear method offers unique flavor profiles, using a cast-iron skillet or flat top cookware provides better results when it comes to developing a crust. Cast-iron heats evenly and retains heat for longer periods, allowing for a more controlled and effective searing process.
Before seasoning your steak, pat it dry with a paper towel to remove any surface moisture. Vacuum-sealed or MAP-packaged steaks often have more moisture, which can impede crust formation. Drying the surface also helps prevent kosher salt from dissolving too quickly.
For seasoning, stick to kosher salt and cracked black peppercorns. Pat dry the steak first to minimize moisture and then apply the salt and pepper. Some people prefer table ground pepper to prevent lifting of the steak, but freshly cracked peppercorns offer superior flavor.
Consider using the arroser method, which involves basting the steak with its own juices during cooking. This French technique helps enhance flavors and can contribute to a better crust development.
Remember that achieving a perfect crust on your steak may involve some trade-offs in terms of doneness consistency throughout the meat. However, the flavorful and crunchy exterior that comes with a well-developed crust is often worth it for steak enthusiasts.

Steak Thickness and Finishing Temperatures
Thicker steaks, such as 1.5 to 2 inches, will build a better crust compared to thinner steaks. The thickness of the steak affects the internal temperature and the ability to achieve a desired finishing temperature. If a steak is too thin, by the time a decent crust forms, the internal temperature may have already overshot the desired range. A thicker steak allows for a thicker crust while still falling within the preferred finishing temperature range.
A thicker crust does come with a trade-off – it results in a gradient of doneness rather than perfect “wall-to-wall” doneness. The outer layer of meat will be well-done, while closer to the center it will be rare or medium-rare. This textural difference in combination with the flavorful crust creates an enjoyable eating experience.
However, it’s important not to go too thick with steaks, as those that are 3+ inches thick can result in a crust that is too thick or even burnt before reaching the desired internal temperature target. While a prime rib roast is cooked differently to achieve an even medium-rare throughout, pan-seared ribeye steak is seared and pulled out of heat slightly earlier to allow for carry-over cooking and reach medium-rare doneness after resting.
In summary, aim for steaks that are around 1-2 inches thick for optimal crust development without compromising on desired finishing temperatures.
What’s Considered Too Thick?
When it comes to steak thickness, there is a point where it becomes too thick to achieve a desirable crust. Steaks that are 3 inches or thicker are considered more like roasts rather than steaks. With such thickness, the crust will become too thick and may even burn before reaching the desired internal temperature.
The issue with excessively thick steaks is also the greater variation in doneness within the meat. For example, if you were to cook a 3-inch steak, you may end up with a well-done exterior and a rare center. This uneven doneness is not ideal for a steak eating experience.
2. Use an Oil to Sear With
To achieve a better crust on your steak, it’s important to use the right oil for searing. Liquids, such as oil, have a better heat carrying capacity than air, meaning they conduct heat from the skillet to the steak more effectively. The oil also increases the surface area of the steak in contact with the heat, which is crucial for the Maillard reactions that create the crust.
However, not all oils are suitable for searing. Oils with low smoke points, such as Extra Virgin Olive Oil (EVOO), are not recommended as they break down at high temperatures and can release unpleasant flavors and substances. Butter is also not ideal for searing due to its low smoke point.
A good option for searing is grapeseed oil, which has a smoke point of around 390F and is neutral in taste. It conducts heat well and allows you to achieve a crispy crust without compromising flavor. Ultimately, choose a cooking oil you prefer and stick with it for consistent results.
Use a High Smoke Point Oil
When searing steak to create a crust, it is important to use a cooking oil with a high smoke point. Oils with lower smoke points will break down at high temperatures, resulting in undesirable flavors and potentially harmful substances. Extra Virgin Olive Oil (EVOO), for example, has a relatively low smoke point and should not be used for searing. Grapeseed oil, on the other hand, has a higher smoke point of around 390F and is neutral in taste, making it an ideal choice for searing steak.
Using a cast-iron skillet or similar flat top cookware can help you achieve a better crust on your steak. These types of pans heat evenly and retain heat for longer periods of time. Before placing your steak in the skillet, make sure it is hot enough by waiting for the oil to reach a “shimmer” or mirror-like appearance on the surface of the pan. This ensures even contact between the meat and the cooking surface.
Before seasoning your steak, pat it dry with a paper towel to remove any excess moisture. This is especially important if the meat was vacuum-sealed or in a modified atmospheric package (MAP). Moisture on the surface of the steak impedes crust formation as it needs to vaporize first before browning can occur. By drying the surface first, you give kosher salt less free moisture to use so that it doesn’t dissolve and breakdown.
For seasoning, stick with kosher salt and cracked black peppercorns. The larger grains of kosher salt help draw out moisture from the surface of the steak, promoting better browning. Freshly cracked peppercorns are preferred over table ground pepper for their superior flavor. By seasoning the steak after drying it, you prevent the salt from dissolving and losing its effectiveness.
Thicker steaks tend to build better crusts. This is because thicker steaks have a longer cooking time, allowing for more browning and flavor development. If your steak is too thin, the crust may not develop properly before reaching your desired internal temperature. Aim for steaks that are at least 1 inch thick, with thicker cuts (1.5 – 2 inches) leading to even better crusts.
To achieve a better crust on your steak, you may need to accept certain trade-offs. For instance, if you prefer “wall-to-wall” doneness at a specific finishing temperature, methods like sous-vide or reverse searing may be more suitable. These methods provide consistency in terms of finishing temperatures but may not result in a substantial crust. However, if you value textural differences in steak and enjoy the flavors and aromas that come with a crust, then following these techniques will enhance your eating experience.

3. A Hot Cooking Surface
Having a hot cooking surface is crucial for achieving a good crust on your steak. This is why using cast-iron skillets or similar flat top cookware is recommended. Cast-iron heats evenly and retains heat for a long time, ensuring that the surface of the pan remains hot throughout the cooking process.
Before placing the steak on the hot cooking surface, it’s important to wait for the oil to reach its optimal temperature. You want the oil to almost become mirror-like or shimmer on the surface of the pan. This ensures that there is even contact between the meat and the cooking surface, allowing for a more consistent crust formation.
It’s worth noting that you don’t need to get your skillet as hot as possible. Making it too hot can cause the seasoning on your skillet to burn and result in an overcooked or burnt steak. Instead, aim for a temperature that allows for proper browning without burning.
Additionally, patting dry your steak before seasoning it helps in crust formation by reducing excess moisture on the surface of the meat. When there is less moisture, it allows for better contact with the cooking surface and prevents steam from lifting the steak off the pan.
For seasoning, kosher salt and cracked black peppercorns are commonly used. However, if you prefer table ground pepper, make sure to adjust your pepper mill properly to ensure freshly cracked peppercorns are used. Drying and seasoning techniques should be done prior to cooking, giving enough time for any dry brining process to take effect.
Overall, having a hot cooking surface is essential in creating a flavorful and crispy crust on your steak. Using cast-iron skillets or similar cookware helps maintain heat consistency throughout cooking, while proper drying and seasoning techniques enhance crust formation.
4. Pat Dry the Steak Before Seasoning
4. Pat Dry the Steak Before Seasoning
Before seasoning your steak, it’s important to pat it dry with a paper towel. This is especially important if the meat was vacuum sealed or in a Modified Atmospheric Package (MAP), as these types of packaging can leave the surface of the steak moist. The moisture on the surface needs to vaporize before a crust can form, and it can also cause the steak to lift off the cooking surface.
By drying the surface of the steak first, you give the kosher salt (or any other seasoning) less free-moisture to use, preventing it from breaking down and dissolving. This helps create a better crust on the steak. If you prefer to dry-brine your steak, it’s best to do so a day in advance rather than on the same day you plan to cook it. Giving the steak enough time to dry brine prevents any pooling of surface moisture and ensures that your dry brining efforts are effective.
Overall, patting dry your steak before seasoning is an important step in achieving a better crust on your steak. It helps remove excess moisture and allows for better contact between the meat and cooking surface, resulting in a more flavorful and textured crust.
5. Add Butter to Baste With
Adding butter to baste with is a popular method to enhance the crust on your steak. As the steak cooks, you can use a spoon or a brush to continuously coat the surface of the meat with melted butter. This helps to keep the steak moist and adds an extra layer of flavor. The fat in the butter also aids in browning and caramelization, resulting in a more pronounced and delicious crust. However, it’s important to note that using butter for basting can lower the smoke point, so be careful not to let it burn.
6. Pull the Steak at a Measured Internal Temperature Below Your Desired Temperature
Pulling the steak at a measured internal temperature below your desired temperature is an important step in achieving a better crust. When searing or grilling steak, it’s crucial to remove the steak from the heat source before it reaches your desired internal temperature. This is because the residual heat will continue to cook the steak even after it’s been removed from the heat source. By pulling the steak at a slightly lower internal temperature, you can ensure that it reaches your desired doneness level without overcooking.
For example, if you prefer your steak to be medium-rare, which typically has an internal temperature of around 130-135°F (54-57°C), you’ll want to pull the steak from the heat when it reaches around 125-130°F (52-54°C). This allows for carryover cooking to bring the internal temperature up to your desired level while still preserving a juicy and tender texture.
The reason for pulling the steak below your desired temperature is to avoid overcooking during carryover cooking. If you were to pull the steak exactly at your desired internal temperature, by the time it rests and carries over cooking, it could end up being more cooked than you’d like. By pulling it slightly earlier, you give yourself some leeway to achieve optimal doneness.
Things I’ve Tested But Never Noticed a Difference With
1. Pull the Steak at a Measured Internal Temperature Below Your Desired Temperature:
I have tested pulling the steak from the heat source when it reaches a temperature slightly below my desired finishing temperature, and I have not noticed any significant difference in the crust formation. It is important to note that carryover cooking will continue to raise the internal temperature of the steak after it is removed from the heat, so pulling it early can result in overcooking.
Allowing Steak to Come to Room Temperature
Letting your steak come to room temperature before cooking is a common method used to promote more even cooking. By allowing the steak to sit at room temperature for about 30 minutes before cooking, you can ensure that the internal and external temperatures are more balanced. This helps to prevent overcooking the exterior while waiting for the interior to reach your desired doneness. However, in terms of building a crust on your steak, I have found that allowing it to come to room temperature didn’t make a noticeable difference.
One thing to keep in mind is that the time it takes for a steak to come to room temperature can vary depending on its thickness. Thicker steaks will take longer compared to thinner ones. So if you do choose to let your steak come to room temperature, make sure you plan accordingly.
Overall, while allowing your steak to come to room temperature may have other benefits in terms of even cooking, it doesn’t seem to significantly impact the formation of a crust on the surface of the meat.
Flipping Intervals are Overhyped
Flipping intervals, or the amount of times you flip your steak while cooking, is often emphasized as an important factor in achieving a good crust. However, I have found that this is not necessarily true. In fact, flipping intervals may be overhyped.
The idea behind flipping intervals is that by flipping the steak frequently, you can ensure even cooking and prevent one side from becoming overly browned or burnt. While this may be true to some extent, I have found that it doesn’t make a significant difference in the overall crust formation.
Instead of focusing on flipping intervals, I believe it is more important to focus on other factors such as the thickness of the steak and the temperature at which it is cooked. These factors have a much greater impact on crust formation than how many times you flip the steak.
In conclusion, while flipping intervals may play a small role in achieving a good crust, they are often overemphasized. It is more important to focus on other factors such as thickness and temperature when trying to create a delicious crust on your steak.
Searing Does NOT Create a Moisture Barrier
Searing steak at high temperatures does not create a moisture barrier on the surface of the meat. Many people believe that searing locks in the juices and prevents them from escaping, but this is a common misconception. In reality, searing only creates a flavorful crust on the steak.
When you sear a steak, the heat causes the proteins on the surface to undergo Maillard reactions, which result in browning and the formation of new flavors. This process does not seal in any moisture or prevent it from escaping during cooking.
In fact, searing can actually cause moisture loss if done incorrectly. If you sear the steak for too long or at too high of a temperature, it can dry out the meat and lead to a less juicy final product. It’s important to use proper timing and temperature control when searing to avoid this issue.
To maximize juiciness in your steak, it’s best to use other cooking methods such as sous-vide or reverse searing. These methods allow for precise control of internal temperature and result in more even cooking throughout the steak without sacrificing flavor.
Overall, while searing adds delicious flavor and creates an appealing crust on your steak, it does not create a moisture barrier or lock in juices. Proper cooking techniques and temperature control are key to achieving a juicy and flavorful steak.
In conclusion, achieving a perfect crust on steak requires a combination of high heat, proper seasoning, and adequate cooking time. By searing the meat to create caramelization, using a hot skillet or grill, and allowing enough time for the crust to form, you can enjoy a deliciously crispy exterior while keeping the interior tender and juicy. Experimenting with different techniques and seasonings will help you find your preferred method for creating that coveted crust on your steak.
Learn More About Grilling
If you want to learn more about grilling, check out these other helpful resources!